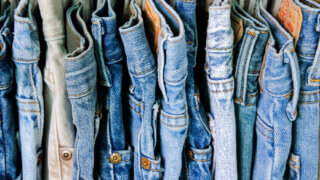
Denim Construction
Denim Yarn
Yarn Numbering
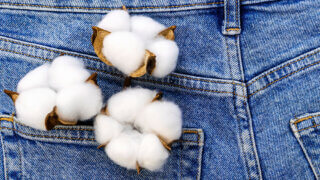
Yarns used in denim fabrics are termed short-staple spun yarns because they are formed from fibers having a staple length of fewer than 2.5 inches. The cotton fiber usually is just over an inch long. One of the key pieces of yarn information for the development and manufacturing of denim is the choice of yarn size. The terms yarn number, yarn count, and yarn size are used interchangeably to refer to the linear density of a given yarn.
Yarns used in denim fabric are termed short-staple spun yarns since they are formed from short fibers having a staple length of fewer than 2.5 inches. In most cases, the cotton fiber is just over an inch in length. One of the key bits of yarn information used in the development and manufacture of denim is the choice of yarn sizes. The terms yarn number, yarn count, and yarn size can all be used interchangeably when referring to the thickness or linear density of a given yarn. There are various yarn numbering systems used to identify the linear density or relative size of denim yarns. The most common system used today is the English Cotton Count noted by “Ne” (capital N and lower case e). In this numbering system, the yarn number represents the number of hanks per pound of a given yarn. The hank is a standard length of 840 yards. Therefore, six singles cotton count yarn means that one pound of the yarn would contain 6.0 hanks or 5,040 yards (6.0 times 840). The English system is an indirect yarn numbering system. This means the yarn number gets larger, the yarn gets finer.
Yarn Spinning Systems
Ring spinning and open-end rotor spinning are the two most common spinning systems used to produce yarns for denim fabrics.
Open-End Rotor Spinning
Open-end rotor spinning is usually just referred to as open-end spinning. During open-end spinning, a strand of sliver is fed into a metal rotating roll that feeds the sliver into a rapidly rotating combing roll that separates individual fibers from the sliver, yet in turn, feeds the individual fibers into a high-speed rotor where the fibers collect into the required thickness of yarn.
From a production standpoint, open-end spinning can deliver the yarns 7 to 9 times faster than the same size ring spinning yarn delivery. Also, open-end spinning uses fewer processes and employs more automation, making it less labor-intensive. Thus, basic open-end yarn is normally sold at a lower cost than ring-spun yarn of the same yarn size.
Ring Spinning
Because of the popular preference for ring-spun yarn, with its higher strength, more authentic vintage look, and softer hand, many open-end yarn suppliers are producing ring-like yarns sometimes referred to as rough spun. These “effect” yarns are produced by varying the number of fibers to the rotor spinning box to intentionally make the yarn more uneven. The yarn can also be made hairier and softer by roughing up the yarn surface as it leaves the rotor spinning box. A ceramic navel with grooves causes some of the fibers on the surface of the yarn to pull free as the yarn is pulled across the navel. Today’s open-end spinning and ring spinning machines are designed to manufacture predetermined yarn effects called slubs. These effects vary from different lengths, different spacing between slubs, or even variations in the yarn count called multi-count. These structured denim yarns are often designed by the fabric designer who chooses from many patterns that have been simulated by the spinner to show what effect it will have on the fabric. The slub pattern can then be easily downloaded to the spinning machine controls. When slubs are only in the warp direction, the fabric is called warp-slubbed denim. When the slubs are only in the filling yarn, the denim is called filling-slubbed denim and when the slub yarns are in both directions the denim is said to be a cross-hatched denim.
Core spun yarns are produced on ring spinning machines by adding a spandex yarn to the core of the cotton fibers. Air-jet and open-end spinning machines can also produce core-spun elastic yarns for denim. The drafted cotton fibers twist around the spandex core to produce an elastic spun yarn. These yarns can now be made with slubs and multi-count as well thus allowing for a slubbed denim with filling stretch properties.
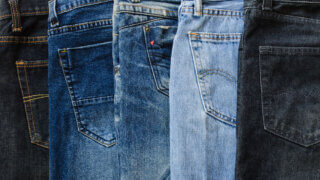
Ring & Open-End Yarn Combinations
Each spinning system has its advantages and disadvantages. Before the late 1970s, all denim yarns were ring spun. Today, denim fabrics have different combinations of ring and open-end yarns. When you hear such terms as Ring-Ring, OE-OE, and Ring-OE, it’s referring to what spinning system was used to create the warp and filling yarns respectively.

Open-End (OE) Spinning

Ring Spinning
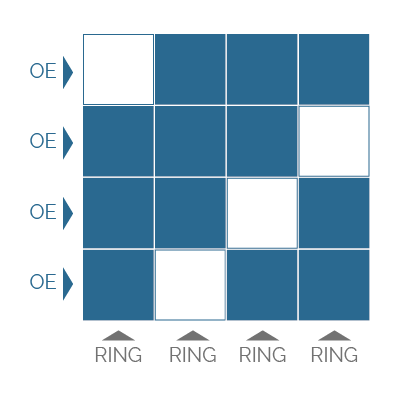
Open-End (OE) & Ring Spinning
Twist
Twist is added to the yarns during spinning.
Z-twist: When the twist in the yarn is in the counterclockwise direction, the twist is called a Z-twist. When looking at a yarn with Z-twist, the fiber orientation will be the same direction as the letter Z. This is the most common twist direction for ring-spun and currently the only direction available for open-end spun yarns.
S-twist: If the yarn is being twisted in the clockwise direction, the twist is called an S-twist. When looking at this yarn, the fibers will be the same orientation as the center portion of the letter S. A Z-twist can only be formed in open-end yarns, while ring-spun yarns can have either Z or S-twist.
Twill may have a right-hand or left-hand angle to the twill line. The appearance of the twill line can be accentuated or diminished by the direction of yarn twist. The effect will be a more or less pronounced twill line. For instance, a right-hand twill and Z-twist give the fabric twill line a low ridge or soft twill, while a left-hand twill and Z-twist give a higher ridge on the twill. On the other hand, a right-hand twill and S-twist give the fabric a higher ridge on the twill, while a left-hand twill and S-twist give the fabric a low ridge or soft twill.
Learn more about the spinning process.
Warping
Warping is the process of transferring multiple yarns, each on a separate yarn package, onto a single collecting package.
In rope dyeing, this package of yarn is referred to as a ball warp. The individual yarns are brought together and formed into a rope. The rope is then wound onto a cylindrical barrel, sometimes called the log. It got its name from when they were originally made from solid pieces of wood. Today, logs are made from metal and covered with rubber. The log does not have end flanges. The yarn collecting package is referred to as a beam. When the yarns are laid in sheet form onto a cylindrical barrel with side flanges and yarn ends lying parallel to one another. In either case, the supply yarn packages are placed on spindles which are located on a framework called a creel.
Traveling package creels are V-shaped creels with the current packages of yarn being used to make the beam or log placed on the outside of the V. The replacement yarn packages for the next warper set are placed on the inside of the V. When the running packages are depleted, the empty packages on the creel are rotated so that the spent packages then move to the inside of the V and the previously stored full packages move to the outside of the V, ready to be processed into the next warp. This system eliminates time lost in creeling up new yarn packages.
Continuous magazine creels are straight line creels with enough package holders so that each end running has a reserve yarn package placed beside it. The tail-end of the running package is tied to the beginning end of the reserve package. Once the running package is depleted, the yarn package transfers over to the reserve package and the warper continues to run. This is a random method of creeling yarn packages and is most effective by mills running beams in balls with a standardized number of ends, yarn types, or yarn counts on them.
Truck creels describe a system where one creel is running yarn packages while a second creel is being loaded. Once the current set of packages is exhausted, the creel is moved out of the way and the second creel is moved into the running position. The yarn ends from the second creel must be pulled forward and threaded through the appropriate guides. In ball warping, anywhere from 250 to 400 yarns or ends are pulled from the creel. These yarns then pass through a comb-like device sometimes called a hack or reed which keeps each warp yarn separate and parallel to its neighboring ends.
Every one to two thousand yards, a lead string is interlaced through the warp yarns at the hack. This string aids the yarn separation into sheet form during the subsequent rebeaming operation after dyeing. The yarns then go through a funnel-shaped device called a trumpet which condenses the sheets of yarns into rope form. The trumpet is located at the base of the warper head and moves back and forth guiding the rope of yarns onto the log. Once the yarns have been wound onto the log, this package is known as a ball warp and is ready to be delivered to the indigo rope dye range.
During beam warping, yarns from the creel are in a sheet form and are wound parallel to each other onto a flanged beam. These yarns will not go through the indigo dye range but can be either slasher dyed or left natural. If left natural, the resulting fabric could then be piece dyed or used as a natural denim which could even be later garment-dyed, if desired. Another option could be to beam dye the yarns using something other than indigo dye.
Dyeing
Most denim fabric is yarn-dyed. The warp yarns are dyed with indigo while the filling yarns are left undyed. However, solid shades are becoming more popular and can be dyed by various methods.
With the advent of denim garment washing techniques, the construction and dyeing techniques used are of utmost importance. The selection of yarn, the consistencies of the indigo dyeing process, and its modifications have become crucially important in determining the quality and performance of indigo denim products. The properties of the indigo dye account for the wide variety of color designs that are available on denim products.
Indigo is unique as a major textile dye because the indigo dyeing process naturally ring-dyes the cotton yarns. Unlike almost all other commercially successful dyestuffs, the indigo dye concentrates in the outer layers of the yarn during the dyeing process. This produces an intensive ring of color around a white core in the yarn, thus the name ring dyeing. With most dyes, if ring dyeing occurs it’s considered a dyeing defect.
Indigo dye, an intense blue, is insoluble in water and will not dye cotton fiber. In order to dye cotton yarn, the indigo must first be converted into a water-soluble lueco form and then applied. This chemical process is known as a reduction. Reducing solutions containing sodium hydrosulfite and sodium hydroxide chemically change the indigo dye into its soluble form. This process also converts the dye from its intense blue color to a very pale greenish-yellow color. The outer layers of the yarn readily absorb this lueco form of indigo. Once in the yarn, the indigo is returned to the insoluble form by oxidation. During oxidation, the ropes of yarn pass through the air in a process called skying. The oxygen in the air converts the dye back to its original insoluble form and its blue color returns.
In traditional rope or ball warp dyeing, the following steps are involved:
Scouring > Indigo dye application > Rinsing > Drying
The ropes are first fed into one or more scouring baths which consist of wetting agents and detergents. The purpose of these baths is to remove naturally incurring impurities found on the cotton fiber such as dirt, minerals ash, and pectin. Additionally, the waxy layer on the fiber which repels water is also removed. It’s very important to remove these materials to guarantee uniform wetting and dyeing. The ropes are subsequently fed into two or more water rinsing baths. The key to this process is the dyeing segment where the indigo dye is added in layers to the outer surfaces of the yarn.
Warp/Ball Warp Dyeing
In warp or ball warp dyeing, the yarn is passed into a vat of soluble indigo dye that exhausts on the surface of the yarn and is then oxidized. This results in a small amount of dye being deposited on the surface, yielding only a light blue dyed yarn. In order to obtain a deeper blue shade. The dye must be built up in layers by multiple passes of the rope of yarn into the subsequent vats of soluble dye and then into the air for oxidation. Each of these cycles is called a dip. Normally this process is repeated from three to nine dips in order to build up a rich, deep blue color.
If even darker shades are required, a sulfur black or sulfur navy dye can be applied to the yarn.
- Sulfur Top: Sulfur dye is applied after the indigo dye.
- Sulfur Bottom: Sulfur dye is applied prior to the indigo dye.
When a sulfur bottom is required, the scoured ropes of yarn are then fed into a bath of a reduced sulfur black dye. Similar to indigo, sulfur dyes are water-insoluble. They must be reduced to a water-soluble form prior to application. Unlike indigo, the sulfur dye can penetrate into the core of the cotton fiber thus darkening the overall color shade. Once the reduced sulfur dye is applied to the ropes of yarn the dye is allowed to oxidize to its normal water-insoluble form. The ropes are then fed into one or more water rinse baths. These baths remove any unfixed sulfur dye that might contaminate the indigo dyeing process. Then the normal indigo dyeing process begins.
Rope Dyeing
In rope dyeing, ball warps are continuously fed into the rope or chain dyeing range for application of the indigo dye. Typically 12 to 36 individual ropes of yarn are simultaneously fed side by side into the range. The ropes are kept separate from each other throughout the various parts of the dye range. Each rope of yarn typically contains 250 to 400 individual cotton yarns. The actual number of ends in each ball is determined by the number of ends that are required on each section beam.
For example, if we have 30 ropes in a dye range and each rope has 350 ends, then the dye range will be producing a dye set with 10,500 ends (30 times 350 ends each). The dyed yarns from each rope are separated onto a section beam. In this dye set, there would be a total of 30 section beams. In most cases, this would mean that this dye set could be broken down into two subsets of 15 sections beams with each containing 5,250 ends.
The ropes of yarn are then fed into the reduced indigo dye baths. Once reduced, the indigo dye takes on a pale greenish-yellow shade. The yarns are then skyed as much as 30 to 40 feet into the air to allow the oxygen in the air to convert the indigo back to its normal water-insoluble blue shade. As the yarns oxidize, they change from a light greenish-yellow shade through various darkening shades of blue-green until they become the deep blue indigo shade. Denim shades require as few as three or as many as nine dips and skying processes. The ropes are then rinsed in several water baths to remove any unfixed or surface dyed deposits. Another option would be to add another sulfur top after the indigo dye has been applied. The sulfur dye still migrates towards the core of the fiber but the sulfur top produces a different type of color performance, especially in garment washing procedures. The sulfur top process is followed by one or more water rinses to remove any unfixed dye.
After rinsing, the yearn ropes pass through squeeze rolls to mechanically extract water. The yarns are then dried and coiled into large tubs. The typical drying apparatus is multiple stacks of drying cans. These metal cylinders are filled with pressurized steam. Care must be taken not to over-dry the yarn or the dye will excessively migrate to the surface of the yarn, increasing the tendency of the color to crock. Additionally, if the surface of the drying can is too hot, the yarn can be overstressed producing an undesirable shiny or ironed appearance.
Coiling takes place after drying. The ropes exit the drying cans and are lifted high into the air and then coiled into large trucks or tubs. Each individual rope is placed into a separate truck. After drying, the color of the yarn is checked either visually or instrumentally. With many indigo dye ranges, the color of the yarn is continuously monitored by a color spectrophotometer which is electronically linked to the controls of the indigo dye baths. This type of control system can automatically adjust the dynamics of the process to obtain the most consistent color from the beginning to the end of the many thousands of yards of yarn contained within a single dye lot.
In order to minimize the color variability often seen between denim panels after garment washing, denim manufacturers will try to use the same dye set or lot to fill a customer’s order. Each roll is sampled and a piece of fabric from each is sewn together into a patchwork blanket and garment-washed using the customer’s garment washing recipe. The swatches are then shade sorted using a color computer and if they fall within the guidelines of the customer, the cloth is shipped to the customer.
Once the warp yarns are rope dyed, it is then necessary to change the yarn alignment from rope form to sheet form prior to entering the next process which is slashing or sizing. Beaming, or re-beaming, involved pulling the dyes ropes of yarn out of storage tubs and moving them upward to a guiding device sometimes called a satellite. This upward travel allows the ropes to untangle before reaching the beamer head. Once the ropes come down from the guiding device, they go through tensioning rollers to help further separate the yarns prior to going through a comb at the warper. The comb separates individual yarn ends and keeps them parallel to each other. From the comb, the warp yarns are guided onto a flanged section beam. Depending on the length of each rope, multiple section beams can be made forming a set of beams. These beams are grouped by dye set, as well as what section of the dye set they were dyed.
For example, a 30,000-yard dye set (we will call it Dye Set 100) may be broken down into three sets of 10,000-yard beams. The first 10,000 yards would be Dye Set 100A, from the top of the rope tub. The second 10,000 yards would be Dye Set 100B from the middle of the rope tub and the third 10,000 yards would be Dye Set 100C from the bottom of the rope tub. The mill would then slash and weave all beams from set 100A together, set 100B together, and set 100C together. Each set would normally contain 8 – 14 section beams. The total number of yarns on all the beams should be equal to the total number of ends in the fabric.
Sheet/Slasher Dyeing
For some producers, sheet or slasher dyeing of indigo has become a reasonable alternative method. Slasher ranges are normally only used to apply size onto the warp yarns prior to weaving, however. They can be adapted to fit onto the exit end of a sheet dyeing range to make dyeing and slashing a one-step process. A sheet dyeing slasher range used for indigo dyeing consists of a creel of section beams for the warp yarn. This yarn is fed into a scouring section where the natural impurities are removed. After the impurities are removed, the indigo dye is applied. Just like indigo rope dyeing, in order to achieve fairly deep shades, the indigo is applied in a series of multiple dip and sky applications to allow for the build-up of shade. If the arrangement of the sheet dyeing range does not allow for multiple dip and sky cycles then only light and medium shades can be obtained from indigo dyes. The dye application is followed by after washing and the yarns can either be thoroughly dried or left with some moisture in the yarns before they enter an accumulator. The accumulator ensures that the dye range does not have to stop while the slasher has a loom beam doffed or a new beam started. In the slasher section, a normal sizing operation occurs where a weaving size is applied to protect the yarn.
Slasher or sheet dyeing ranges have a number of advantages and unique characteristics. Sheet dyeing uses section beams instead of ball warps to form a sheet of yarns which are wound directly onto loom beams. As discussed in rope dyeing, additional handling of the yarn is required. Slasher dyeing works well when manufacturing lightweight denim. In general, slasher ranges require minimal floor space, enable smaller production runs to be more profitable, have rapid turnover time, and are highly flexible in their response to changes in the market. Additionally, the slasher dyeing technique can be used for other types of dyes for cotton thereby producing a wide variety of colors other than indigo blue.
Beam Dyeing
Another dyeing technique that has been used for dyeing warp yarn for denim is beam dyeing. In this technique, hundreds of individual yarns are wound parallel to each other around a perforated, flanged beam. The beam is then loaded into a cylindrical dye vessel that is sealed so the dye liquor can be pumped through the center perforations in the beam and pushed out through the yarn. After dyeing, the yarn is afterwashed, extracted, dried, and then added to other beams for a full set for slashing and then weaving. This technique does not lend itself to the unique dyeing properties of indigo, therefore it is normally used for other dye types including reactives, directs, sulfur, and vats resulting in a wide range of colors. This is also a well-known and accepted technique for many different constructions of cloth other than denim. It’s possible for denim fabrics to be finished and sold without going through any dyeing process. These fabrics are known as natural denims and sometimes are called bull denims. These natural state denim fabrics exhibit the off-white cream color of natural cotton.
After finishing, cutting, and sewing into garments, natural denims can be used like traditional denim garments or they can go through garment-dyeing and other wet processing to yield various properties. These garments will not show the color contrast defects shown by traditional denim garment processing because both warp and filling yarns will be dyed. These natural denims can also be bleached to yield market or finished white denim products. Continuous dyeing techniques are also used to dye natural denim fabrics into solid shades. This method is not normally used for indigo but is commonly used for sulfur, vat, or reactive dyes. After dyeing, these denim fabrics can be finished using the typical denim finishing sequence.
Slashing
The main purpose of slashing warp yarns is to encapsulate the yarn with a protective coating. This protective coating will reduce yarn abrasion that takes place during the weaving operation. The size also reduces yarn hairiness, preventing adjacent yarns from entangling one another at the weaving machine. For many years, native starches or slightly modified starches with other binders were regarded as the most economical way to size indigo warps. The change to garment-washed denims led to new sizing recipes. The type of size used and its quantity will be determined by the finishing operations whether the product is loom state denim or mill finished denim.
On the starting end of the sizing range, the section beams are creeled. From the creeled beams, the yarns from each beam are then pulled over rollers and combined with the yarns from the other beams in the creel to form multiple sheets of yarn. The number of sheets corresponds to the number of size boxes used on the slasher. Usually, there are no more than two size boxes on a denim slasher. As each yarn sheet enters a size box, the yarns are submerged into the liquid size. The yarn sheet then leaves the size box through a set of squeeze rolls which control the amount of wet pick-up the yarns have. Most warp yarns, for weaving denim, will have an 8-16% size add-on. Too much size will cause yarn chafing and excessive shedding of size particles during the weaving process. Too little size will cause excessive yarn abrasion, clinging and entangled ends, and low weaving efficiencies. Yarn abrasion can result in the indigo dye being scraped off the yarn. This results in the effective yarns washing down to different depths of blue dye and causing streaky-looking fabric. The yarns are then pulled over steam-heated cans or cylinders where drying takes place.
The yarns will be monitored to maintain some moisture known as moisture regain. For cotton, moisture regain is typically 6-8%. The yarns will then go through a set of stainless steel split rods which help to separate them into individual sheets equivalent to the number of section beams in the creel. This ensures that yarns from one sheet are not adhering to yarns from another sheet. After passing through the split rods, the warp yarns are collected into one single sheet and passed through a comb which helps to separate each individual yarn originating from a particular section beam. An expansion comb is used to adjust the width of the sheet of yarns to the loom beam width and to evenly space the yarns. At this point, all the warp yarns are wound onto a single loom beam. Normally several loom beams are produced from a single set of section beams in the slasher creel. In many denim styles, the size will be left on the fabric and act as a stiffening agent that aids in garment manufacturing.
Denim Garment Construction: Spreading, Cutting, & Sewing
Spreading
Before marking and cutting, the denim fabric must be spread on the cutting table. All rolls must be from the same fabric dye lot. The plies of fabric are placed exactly on top of each other. Care is taken to mark defects and piece ends.
Denim rolls are very heavy and are oftentimes handled one at a time with a forklift. Because there is a major issue of shade variation from one dye lot of fabric, most manufacturers try to group the rolls from the same dye lot together. Stackable pallet racks facilitate such storage and allow a large number of similar rolls to be delivered to the cutting room at one time.
A supervisor or lead person in the cutting room will typically roll out the assigned marker on the cutting table. The marker will be checked to ensure that it is appropriate for the fabric being used, that all of the pattern pieces are included for the sizes designated in the cut order. The table will then be marked with the appropriate splice marks, and notation will be made of any variation of ply height from one section to the next.
Because of the weight of denim rolls, most are loaded onto a spreading machine using a forklift, a hoist, or two people. The operator spreads the fabric according to the length of the combined sections in the marker. Roller bearings on the machine allow the roll of fabric to move freely. The operator secures the fabric at one end and then allows the weight of the fabric to turn the roll and feed off the necessary fabric. This is possible with denim because there is little stretch in the fabric. The spreader will adjust the spreader cart to maintain an even edge of fabric onto the near side of the spread and watch for fabric defects as the fabric lays onto the table. Each end of each ply of fabric should be cut squarely and accurately to avoid wasting fabric or to avoid having garments with incorrect piece length.
With directional fabric which has a face side, the company may choose to spread all of the fabric with the face side up. This requires the spreader to walk the length of the table without laying down fabric for each ply. The total height of a spread, the total number of ply, is determined by the cutting process used. Whenever the spreader finds a defect in the fabric, it must be cut out. Some of the flaws or joints are pre-marked by the fabric mill. To ensure that all garment pieces are complete, the spreader must use designated splice marks to determine where the fabric can be cut and restarted.
Once the appropriate number of ply has been laid on the table, the paper marker will be rolled out and positioned to provide the cutter with an outline of each pattern piece. It is quite common to have multiple sections in a marker, each of which contains all of the pieces to make a designated number of garments for a particular size. Because equal quantities are not needed in all sizes, different sections may require a different number of ply. The appropriate paper marker should be cut to fit on each section to avoid distortion in the pattern pieces.
Cutting
Once the fabric is laid for cutting, the marker is positioned to provide the cutter with an outline of each pattern piece. The markers are arranged to allow for maximum usage of the fabric, with as little waste as possible. It is common for a marker to have several sections, each of which contains all of the pieces needed to make a designated number of garments in a particular size.
The cutting process on denim requires considerable force because of the density of the fabric. Consequently, there is a limited number of ply that can be cut regardless of whether the fabric is cut manually or with a computer-controlled cutter. The cutter must guide the knife through the fabric following the lines drawn on the marker laid on the top of the spread. Unfortunately, the more efficiently the pattern pieces are laid into a marker, the more difficult the cutter’s task becomes. There are, of course, some areas where cutting accuracy is more important than others because of multiple pieces that must fit together.
In addition to these areas, the cutter must pay particular attention to notches and corners. Shade mark parts is required because of the mentioned shading issues and the fact that a garment has pieces sent to many departments and then returned for assembly. Most manufacturers adhere a special sticker to each garment piece that denotes the size, bundle, and ply number of the garment. These stickers may be applied to all pattern pieces or just major body pieces. The numbering system makes the cutting room aware of missing pieces early in the process as well as giving the sewing operator a checking mechanism to ensure that bundles have not been mismatched or have one or more ply out of the proper rotation within the bundle. Once the fabric is cut, control tickets are placed on each bundle of parts to aid in process control tracking as well as matching the appropriate parts. The bundle parts operation is where individual pattern pieces are tied into bundles and sent to the appropriate department where sewing begins.
Sewing
The assembly of denim fabric into jeans is a fairly complicated process. After cutting, the parts are marked for shade and then sewn into jeans. The heavy weights of most denim fabric and the fabric’s rigidity mean that heavy-duty sewing machines must be used.
Now that cutting is complete, the process continues with assembling the jeans components. Denim jeans are made of many components including:
Pockets
Special sewing techniques are used including bar tacking for special pockets and added strength. There are two basic types of pockets: patch pockets and hung pockets. The patch pockets have the edges turned under, this is called a hem pocket. To finish the top of the pocket, the material is run through a folder and stitched parallel to the folded edge. The number of rows of stitching and the color of the thread are often considered a style feature. When sewn by manually sliding the material into the folder, the operator must carefully control how much fabric is fed into the folder. It is typical to sew the pockets, still connected by the thread, into a box and then clip and stack them apart. The use of an automatic machine reduces the skill level of the attending person to that of a loader and will normally include the stacking function.
Decorative stitch pockets are both a tedious and important task. Many jeans manufacturers consider pocket stitching to be a trademark. Some companies even carry it to the point of sewing two rows of stitching with two passes of a single needle machine rather than using a two-needle machine in one pass. Typically the pockets are stitched after hem pockets to ensure the placement of the stitching relative to the finished edge. When trademark definition and capital expenditure allows, the use of a programmable sewing machine greatly reduces the skill required and makes reproducing the exact contour of many different designs possible. The machine is equipped with a clamp that moves the pocket under the sewing needle, therefore only requiring a loader rather than a skilled operator. A lockstitch will normally be used to prevent the entire design from raveling out if one stitch is broken.
The set patch pocket is very similar whether the pocket is set to the back panel of the garment or to a sub-assembly as done when attaching the watch pocket to the front pocket facing. The operator must fold the edges of the pocket under and then accurately follow the designated contour of the pocket. Depending on the style features, this may be done with a single needle or double needle lockstitch. To increase flexibility, the operator may use a double needle machine but remove one needle for the appropriate single needle styles.
Marking a pocket outline with chalk is one of many methods used to ensure proper pocket placement. The difficulty of this operation, and the lack of skilled operators, have forced many companies to spend the money on automatic pocket setters. These computer, or CAM-controlled machines, require special attachments for each style and therefore limit the variety of pocket shapes offered.
Hung pockets are pieces of fabric either the same as the garment or some less expensive pocketing material that are attached to the pant at a seam and form a bag or pocket when finished. When a different material is used the customary practice is to sew a piece of the body fabric, a facing, onto a portion of the pocket that will show in the finished garment.
Set pocket facings is the operation that attaches the facing to the pocket back. Labels or decorative items may be attached to either piece before they are sewn together.
Staystitch labels is an operation that exactly positions the labels that will be sewn into the garment during a subsequent operation. Prepositioning one or more labels in this manner frequently makes the subsequent operation, such as set band, which is done from the opposite side of the garment less difficult and reduces quality problems.
Once all preliminary operations are done to a hung pocket, it goes to a close pocket bag where several of the edges are closed often after folding the fabric to eliminate having to sew one side. This operation is typically done with a safety stitch seam in order to increase the durability of the pocket.
Before the pocket is sewn to the pants it must be turned right side out. This turn pockets operation utilizes a pointed rod or dowel to shape the corners and fold the seam in the proper direction.
The closed pocket bags are then attached to the garment in the set from pocket operation. A single needle lockstitch is often used because of the unusual curves which are used as style features on the pockets. This operator has a significant impact on the final look of the finished garment, especially the consistency from the left side to the right side. To improve the efficiency of this job and to allow the operator to follow the same curve line for a number of garments, all of the left fronts in a bundle will be sewn, and then all the rights.
Yoke
A regular style feature of blue jeans is to have a yoke or riser attached to the lower panel of the jean back. In addition to appearance, this panel can add some functionality to the shape of the garment when cut in the appropriate direction of the fabric. Set back riser is performed with an off the arm felling machine which utilizes a double folder to turn both ply to the inside with the resultant interlocking seam.
The double-needle chain stitch machine with an extended arm allows for easier positioning of the parts and creates a very durable seam with a little stretch. Because the same type of seam is used to fell seat seam, this plant chose to have the same operator perform both sews.
The thickness of the fabric when the two risers are sewn together requires extra care on the part of the operator. One method of closing the outseam of pants is to sew them with a single-needle stitch. While not extremely common in jeans, this method does allow for easier alterations.
Front & Back Leg Panels
To maintain the integrity of the fabric in the seam during wear and washing, it is necessary to overedge the panels before they are seamed together. By performing this operation after the seat seam is joined, the operator must pick up and dispose of fewer panels. The back panels are then ready for assembly. The same method is used to overedge the front panels before the fronts and backs are joined.
Zipper
Set zipper to fly is a small parts operation that joins the edge of the zipper tape to the inside piece of the front panel. Some plants use a zipper that is already cut to length, while others use zipper tape from a continuous roll and then chop it apart. A double-needle chain stitch is used to provide extra durability and some give or stretch in the finished fly. Set fly to front and edgestitch is a two-step operation utilizing the same single needle lockstitch machine. The operator stitches the fly assembly with a zipper attached to the front and then creases the seam with the back edge of the snips to ensure that the underlying plys of fabric fall in the appropriate direction.
The seam is then edge-stitched, a very narrow topstitch to hold the seam in place and for reinforcement. Once the fronts are joined a specialty machine is used to bartack fly. This stitch forms a very strong reinforcement, performing very closely located zig-zags with several lengthwise stitches. Exact positioning is required to eliminate any puckers at the front of the garment and to provide the intended support.
Once the inseam is joined together, it is reinforced by the topstitch inseam operation. One of the more difficult parts of this job is to get the underlying seam to lay in the proper direction, especially at the crotch seam. A single needle lockstitch, while uncommon for jeans, would allow for easier alterations of a garment. If the stitch should break, it will not unravel. The operator will then use an edge guide to maintain a consistent seam margin down the side of the pant.
Waistband
Bust side seam with a hand iron is an operation that spreads open the two-ply of fabric down to the stitch line. This ensures that the seam will be evenly distributed in the bottom hem of the leg. The set waistband operation attaches a folded band to the completed pair of pants. The band is cut from the marker and is long enough to encircle the finished circumference of the pant plus enough to tuck into the end of each band.
The operator then inserts the band into a folder that turns the lower edges of the band to the inside, creating a finished edge inside and out. The operation is performed with a multi-needle chain stitch machine. The operator must tuck the ends of the band inside after the fold is created by the folder and before the end of the band is positioned at the needle. At the trailing end of the band, the operator must also tuck the ends before the edge of the garment goes under the sewing machine foot. Using a cylinder bed machine makes it easier to sew the circular top of the pant. The operator should take care to keep the hung pockets from being caught in the seam.
Waistband Product Label
Once the waistband is set, the set waist label can tie the stitch line into that of the waistband set machine. The label must be set in an exact position and is considered a trademark by most companies.
Belt Loops
Belt loops are often cut in the spread of cloth in order to ensure the color match of the finished fabric. Care must be taken to keep all the loop strips together and matched up with the same lot of pants. The ends of the strips are overlapped as they are fed into the folder for making belt loops. The double-needle lockstitch machine is set in a cover stitch configuration to form a decorative stitch on the top and protect the raw edges on the bottom. Pressing the continuous chain may aid the automatic machine in measuring the loops and detecting the overlap joints so that the joints will be cut out and not go onto a pant. Setting belt loops is normally a difficult task because of folding the short ends and holding them in an exact position during the sewing. An automatic loop setter reduces the difficulty of that task to simply being able to position the garment band in the proper location for the loop. The machine will cut the loop to the proper length, fold the ends under and then sew both ends of the loop. The machine may have a red dot light to aid in positioning. The position of the stitches on the loop must match the style features of the garment. The bar tack machine will be set to the proper length and number of stitches as noted in the garment specifications.
Buttonhole
Once the waistband is complete the buttonhole is sewn into the end of the band. This particular sewing machine is computer-controlled to set the length of the buttonhole and the number of stitches. These specifications will be determined by the size of the button to be used on the finished jean. The operator simply positions the pant onto a guide on the machine bed and activates the machine to complete the sew thus reducing the skill required. The sew time is long enough to allow the operator to grasp the next garment.
Rivets
Reinforcement of the front pockets has developed into a marketing tool. Many of the rivets are custom-produced for a jeans manufacturer even when more commonly available rivets are used, the placement is dictated by the spec sheet and may be used as a style feature. The rivet can be set with a motor-driven machine where the rivets are fed from a hopper and the operator simply activates the machine. The placement of the rivets may be guided through the use of a red dot pointer. The other extreme of this operation is when the operator loads the rivets into the magnetic holding dye and then forces the rivet pieces together using a leg pressing motion.
Cap
Set metal cap button is very similar to the rivet operation. Jeans typically do not have a sewn-on button but have a pointed metal stud that is forced through the fabric and then a cap with a shank is forced down over the stud. In most cases, the operator will use an edge guide to position the garment. Some manufacturing plants mark the placement of the button through the buttonhole and then use a red dot light to accurately position the pant. Any quality problem at this operation will require the replacement of the waistband and all subsequent attachments such as loops and labels.
The metal caps are decorative and are frequently part of the trademark of the manufacturer. The press machine normally has both the studs and the caps fed automatically to the work position through a track. In some cases, the size or design of the cap or mechanical failure does not facilitate automatic feeding of the parts and the operator must position one or more parts by hand. This significantly increases the time required for the job but not necessarily the skill required. Trim and inspect pants is next performed to detect any defects in the fabric or the sewing of the garment.
When garments are to be washed, the function is typically performed before going to the laundry because any open seams will ravel during the wash process and render the garment unusable. There will typically be an after wash inspection as well to prevent defective garments from going to the customer. The inspector will trim any excessive threads left by the sewing machines as well as determine the department or person that should make the necessary repairs. The button jeans operation is a fairly arduous task because of the thickness of the four-ply of fabric in the waistband and the inflexibility of the metal button shank. This stiffness is more contentious if the pants are buttoned before washing. A wire loop pulling device is a major improvement to the process.
Drawing-In & Warp Tying
When a new denim style is put on a weaving machine, it is necessary to draw or insert the warp yarns through various loom elements, including:
- Stop motion devices
- Weave design control devices
- Filling beat-up device
Each end of yarn must have its own individual drop wire and heddle and be inserted into the correct dent in the reed. This procedure can be done manually or automatically on drawing-in machines.
Next, each warp yarn passes through its own heddle that is suspended in the harness. The heddle has an eye through which the yarn passes and allows for exact control of each yarn. The harnesses control the raising and lowering of the warp yarns. The yarns then proceed through the dents of the reed.
The reed is a comb-like device that maintains the spacing of the warp yarns, controls the width during weaving, and performs the beating up of the filling yarn into the body of the cloth.
The point where the yarn is beaten up into the cloth is called the fell-of-the-cloth. This is the transition point where the yarn becomes fabric. The cloth now winds over the take-up roll, sometimes called the sand roll or press roll, which when combined with the let-off of the loom beam controls the number of picks per inch in the fabric.
Finally, the cloth is rolled onto a cloth roll. The threading or drawing-in of the yarns can be done manually or automatically on drawing-in machines. Of course, manual drawing-in is much more time-consuming. When the same end count and draw are to follow on a loom with a depleted warp, then a full beam of yarn can be tied to the yarns of the old beam. This can be done by the use of a tying-in machine that automatically selects an end of yarn from the old beam and ties it to the appropriate end on the new beam. This can be done very quickly with minimum loom downtime.
Yarn Flow
Warp yarns are fed from the loom beam and pass over a whip roll or rollers, which help to control variation in yarn tension during weaving. The yarns are then directed through drop wires, heddles, and a reed. The spaces between the reed wires across the width of the reed are called dents. Each reed will have a specific number of dents per inch—12 to 18 for most denim and denim-type fabrics. The reed number and the number of warp ends determine the woven width of the fabric. In denim weaving, each reed will have a specific number of dents or spaces per inch, 12 to 18 for most constructions. There are normally four warp ends drawn per dent in the standard 3 X 1 twill denim fabric.
The number of harnesses is determined by the denim weave pattern, the number of ends, and the pattern selection device on the loom. The flow of the filling yarn is somewhat simpler. The yarn is fed from large packages located outside the actual weaving machine. As the yarn comes off the packages, it is wound onto a storage feeder which accumulates the yarn under consistent tension and precise length for each pick insertion. This allows for more uniform fabric. The yarn is then introduced to the filling insertion mechanism and inserted across the separated and evenly spaced warp yarns which have formed what is called a weave shed or warp shed.
Basic Weaving Motions
Four basic motions are required to weave fabric such as denim:
- Shedding determines the design
- Filling insertion determines the range of speeds
- Beat-up pushes the inserted filling yarn into the fabric
- Warp control (let-off or take-up) determines the rate at which the fabric will be made
Shedding
Shedding is the process of creating a path across and through the warp yarns by raising some warp threads by their harnesses and by leaving other yarns down by keeping their harnesses in the down position.
There are three methods of creating a shed:
- Cam shedding is the most basic of shedding motions. It uses profiled cams to move the harnesses up and down. Cam looms usually have 6-8 harnesses. Cam looms are best suited for simple weaves like plain weaves, basic twill weaves and satin weaves. Pattern changes require changing the harness cams, which is a simple process.
- Dobby shedding uses an electronic or mechanical device to select and move individual harnesses. Up to 28 harnesses can be used to weave complex twills, satins, small geometric figures, and pattern stripes.
- Jacquard shedding is the most complex shedding system. It is named after its inventor, Joseph-Marie Jacquard, who developed this system in 1801 to be used on handlooms. The jacquard has advanced significantly since then, but it still works on the same principle today. Jacquard shedding exhibits control on each individual warp yarn independent of all other warp yarns, up to 12,000 warp ends can be controlled. These systems can employ mechanical or electronic devices to actuate the warp ends. Design capability is virtually unlimited. Pattern areas can equal the width of the fabric and are almost unlimited in the length. Fabrics made on jacquard looms are normally more expensive because of their complexity and slower weaving speed. There are no harness frames in this style of loom as each end is activated independently being controlled by its own harness cord from the jacquard head. The harness cord is attached to a heddle which is pulled down by a spring in most cases but in some of the older and slower models, weights are used to pull the heddle down to achieve the pattern.
Filling Insertion
Filling insertion involves inserting the filling yarn through the weave shed. The oldest insertion method, shuttle weaving, has almost completely been replaced by other methods such as projectile, rapier, and air-jet insertion. Most denim fabrics are woven using these modern insertion methods.
- Most air-jet machines weaving denim will insert 600-800 picks per minute.
- Projectile looms are capable of 300-500 picks per minute.
- Rapier looms can weave at 500-700 picks per minute.
A good number of old shuttle looms still produce original width and construction denim fabrics for authentic reproduction jeans to fill the need for vintage-looking denim garments.
The warp yarns pass through the reed. The reed is usually cam-driven receding backward during yarn insertion and moving forward after pick insertion. This forward motion beats each inserted pick into the fabric body.
Warp Control
The warp control (let-off or take-up) device controls the rate at which the loom beam feeds the warp yarn into the machine. Tension sensing devices will signal the let-off when more yarn is needed to maintain a consistent warp yarn tension. Fabric take-up mechanisms control the rate of removal of the fabric from the weaving machine. The faster the rate of take-up, the fewer the picks per inch inserted into the fabric. The slower the rate of take-up, the more picks per inch are inserted into the fabric. Thus, coarser and bulkier filling yarns provide more fabric cover and require fewer pick insertion, thus increasing the rate of fabric production. The woven denim fabric is then wound onto a cloth take-up roll which can be either built into the loom or located off the loom.
Most modern denim looms now have off-loom cloth take-ups due to the large batching requirements for modern denim processing. Some machines have inspection stands, allowing for easy inspection of the fabric before the cloth goes to the take-up roll. When the cloth roll has reached its maximum size, which is usually intended to coincide with the warp beam running out of yarn, the cloth is doffed and taken to the dyeing and finishing department.
TERMS TO KNOW (click to flip)
Usually a flat piece of metal with a hole or eye in it that is supported by the Harness frame…
view in glossaryA comb-like device that has warp ends drawn through it on a loom. The reed pushes the filling picks into…
view in glossaryThe point on a loom where yarns become cloth. The point of the last pick beaten up into the cloth.
view in glossaryThe roller, sometimes called the sand roll or press roll, that controls the advance of woven cloth on the loom.
view in glossaryThe process of taking warp yarns off the loom beam and pulling each end through its own Drop Wire, heddle,…
view in glossaryThe open space between the wire in a comb or reed.
view in glossaryThe area formed by the two sheets of warp yarns created when some of the harnesses are lifted and the…
view in glossaryThe process of forming the warp shed and the mechanical system that creates the shed. There are three types of…
view in glossaryThe act of inserting the filling yarn into the warp yarns to make cloth. This process will be one of…
view in glossaryThe process common to all looms where the loosely inserted filling yarn is pushed up into the fabric forming the…
view in glossaryThe function on the loom that controls the take-up of the cloth and the let-off of the warp.
view in glossary