Weaving Basics
What is Weaving?
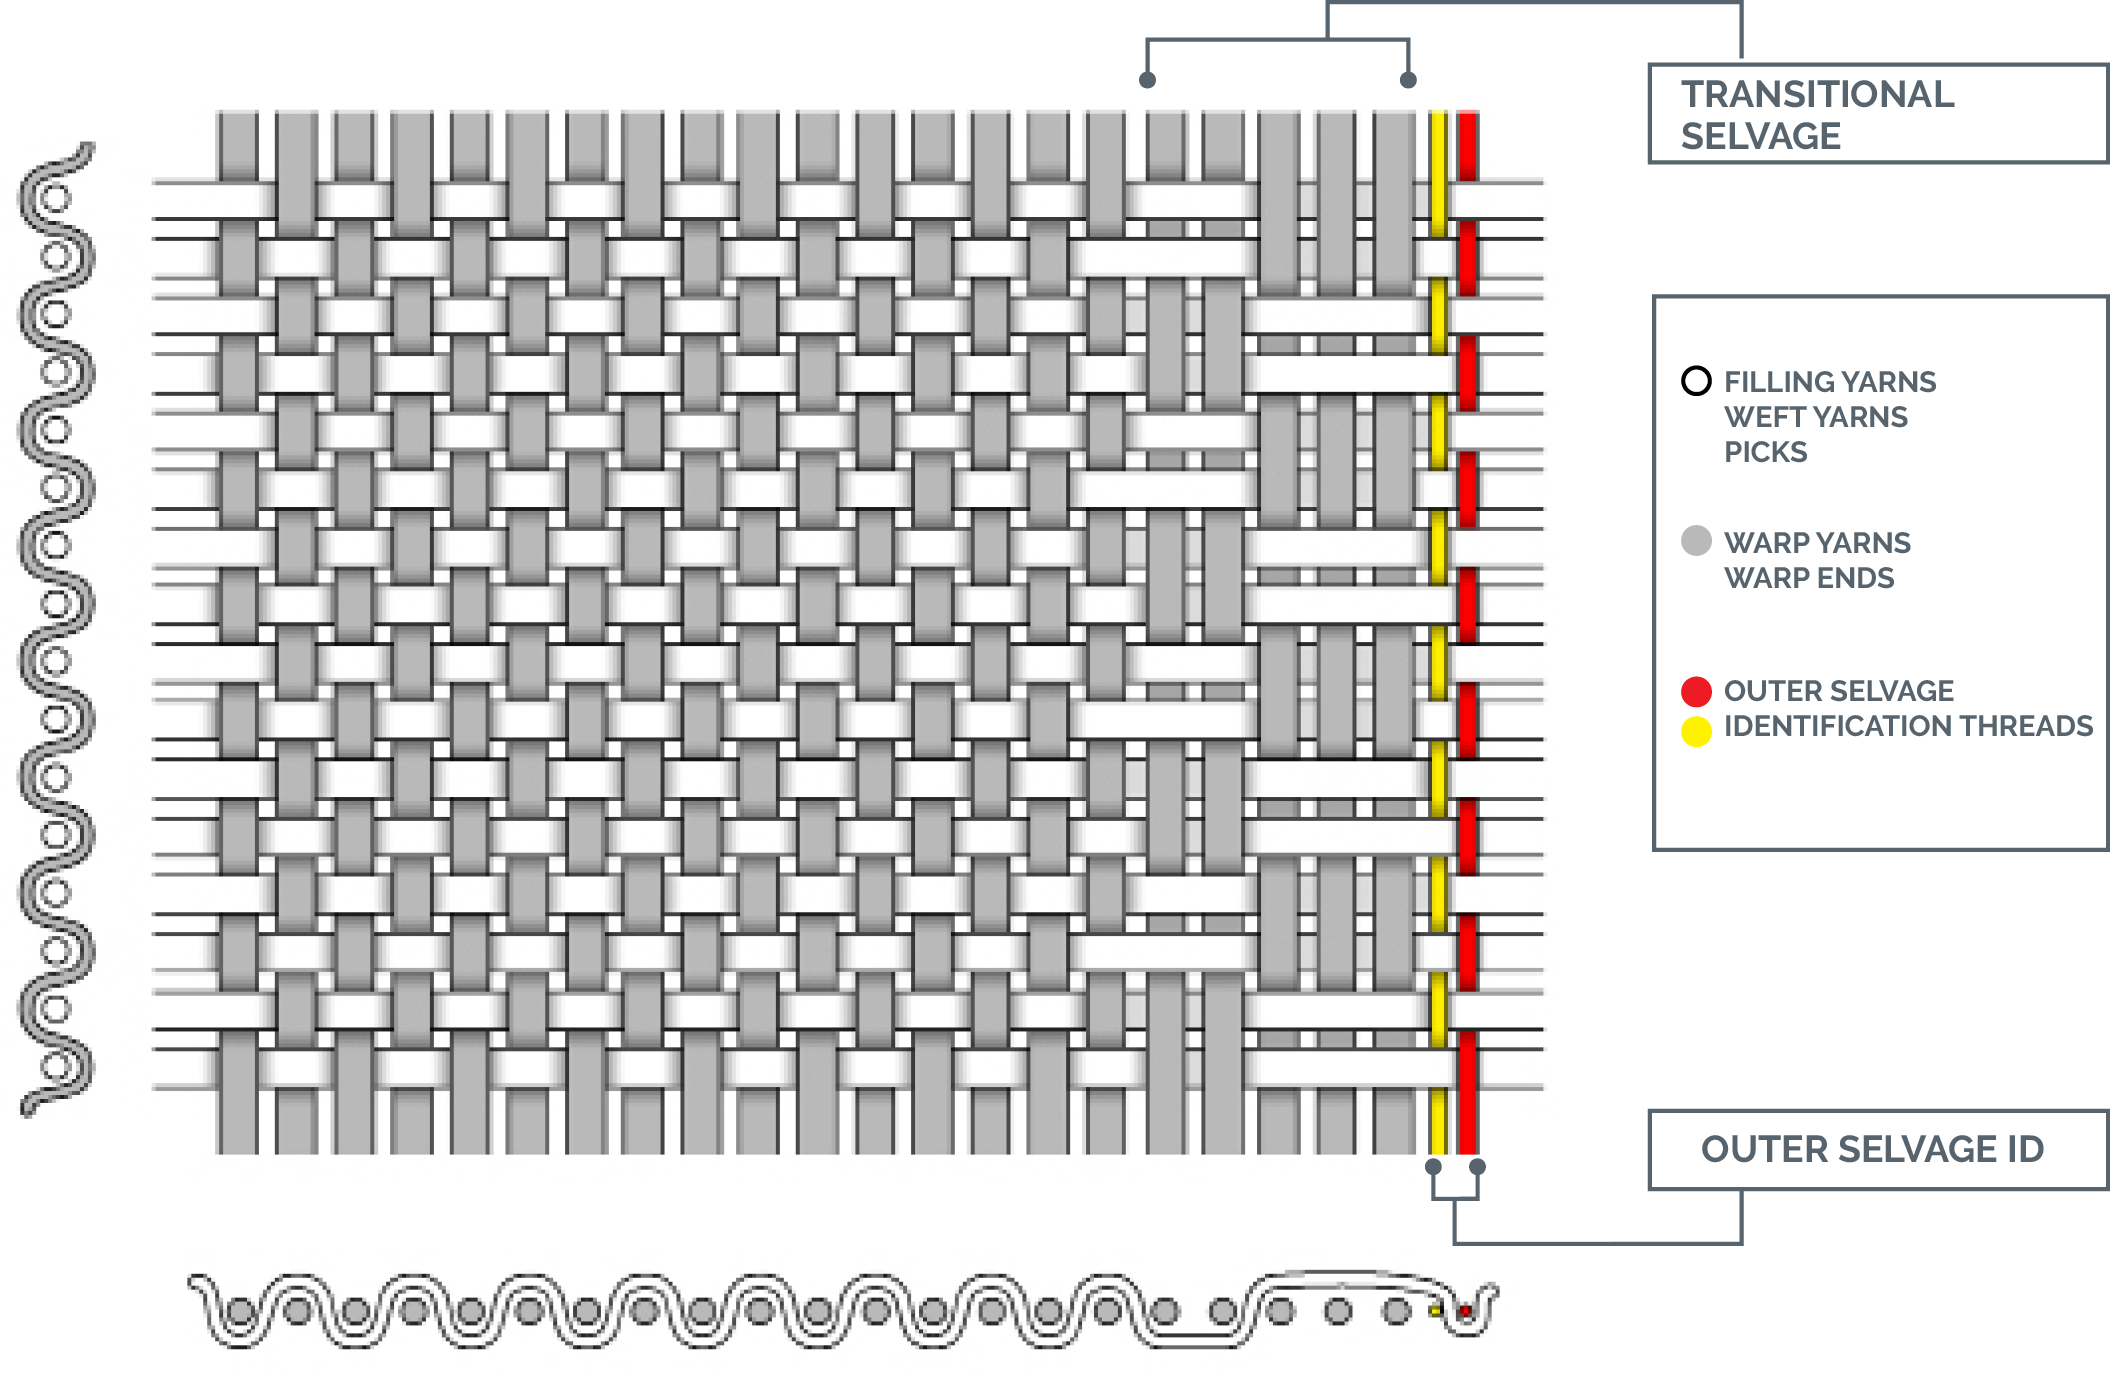
Weaving is the process of interlacing two sets of yarns together to form a woven fabric structure. One set of yarns run along the fabric length or machine direction. These are called warp yarns, warp ends, or simply ends. The other set of yarns run along the fabric width and are called weft yarns, picks, or filling yarns.
Components of a Woven Fabric Structure
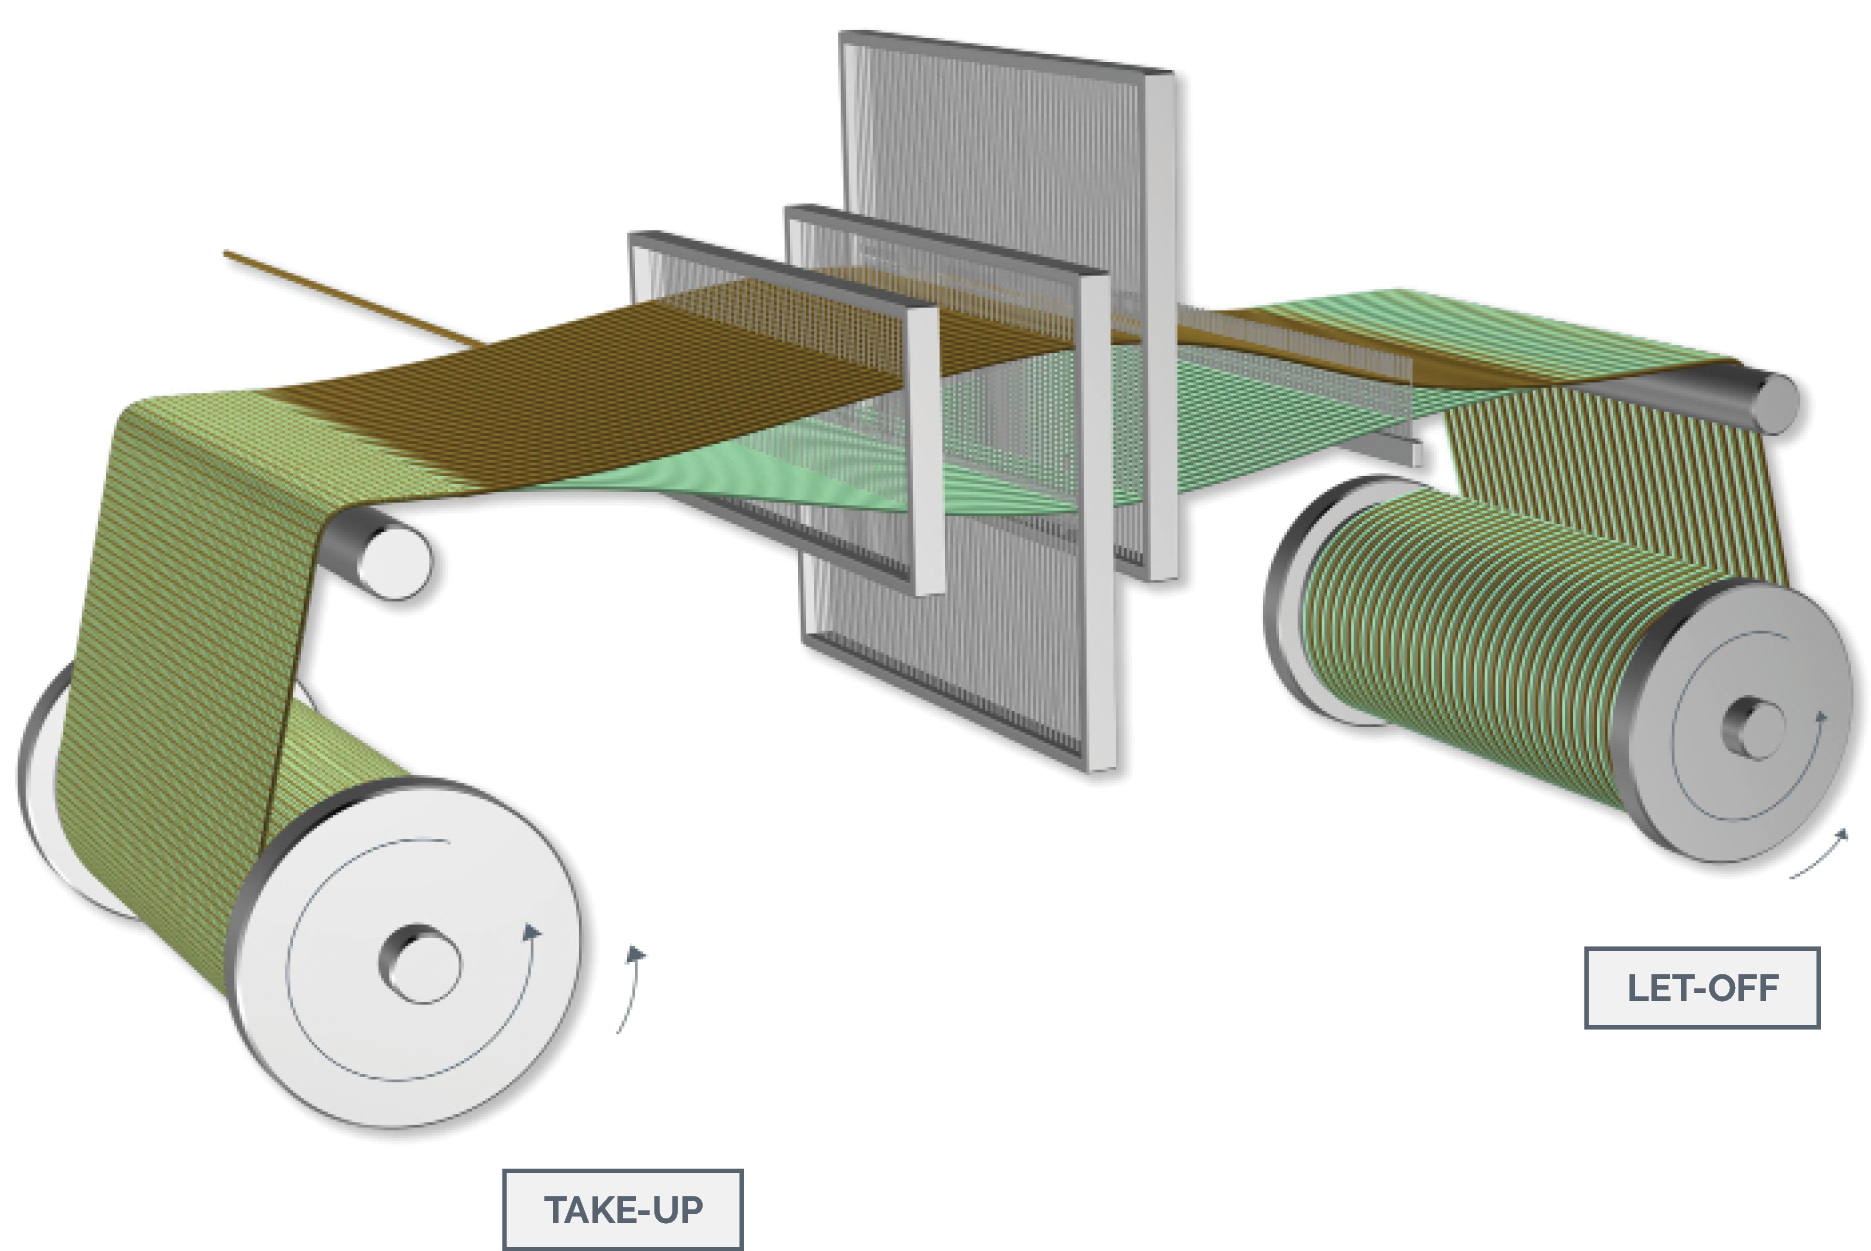
The warp yarns unwind from a loom beam and move forward at a fixed rate as the woven fabric is formed. The weft yarns typically are inserted one at a time across the warp yarns.
The warp yarns are held under tension and are raised and lowered in different configurations to create the weave design. Tension on the warp is necessary in order to form a clear opening, or shed, for insertion of the weft yarns. Warp yarns experience stress, strain, and abrasion as they move up and down and follow a path through the various parts of the loom.
Woven Fabric Designs
The three basic weave designs are plain, twill, and satin. All other weave designs are built around these three basic weaves. More complex weave designs may combine two or more of the basic weave designs.
There are three components of a woven fabric design. The drawing-in draft tells the weaver how the yarns are drawn through the harnesses. The chain plan dictates how the harnesses are raised for each individual pick that will be inserted. When those two are combined, the fabric design is created.
Warp Preparation
Because the warp yarns are under high tension, are very close to one another, and go through various weaving machine elements, they must be properly prepared for the rigors of weaving. The warp yarns go through several processing steps before being wound onto a loom beam that will be inserted at the back of a weaving machine. The processes to prepare the warp yarns for efficient weaving comprise what is called warp preparation; those processes are warping, slashing, and drawing-in or tying-in.
Direct Warping
Direct warping transfers yarns from many cones and winds them simultaneously onto a section beam in a parallel arrangement called a yarn sheet. Further into the warp preparation process, multiple section beams will be combined into the final warp beam that is used at the loom. To prepare the section beams, yarn packages are held on a device called a creel. For spun yarns, a creel typically holds 400 to 800 yarn packages, while filament yarn creels can hold over 1,000 yarn packages. Because most woven fabrics contain well over 2,000 warp yarns, several section beams are needed to provide the required number of warp yarns for a given fabric construction. Each section beam contains the same number of yarns. For a fabric requiring a total of 2,400 warp yarns, 6 section beams need to be formed, each containing 400 warp yarns.
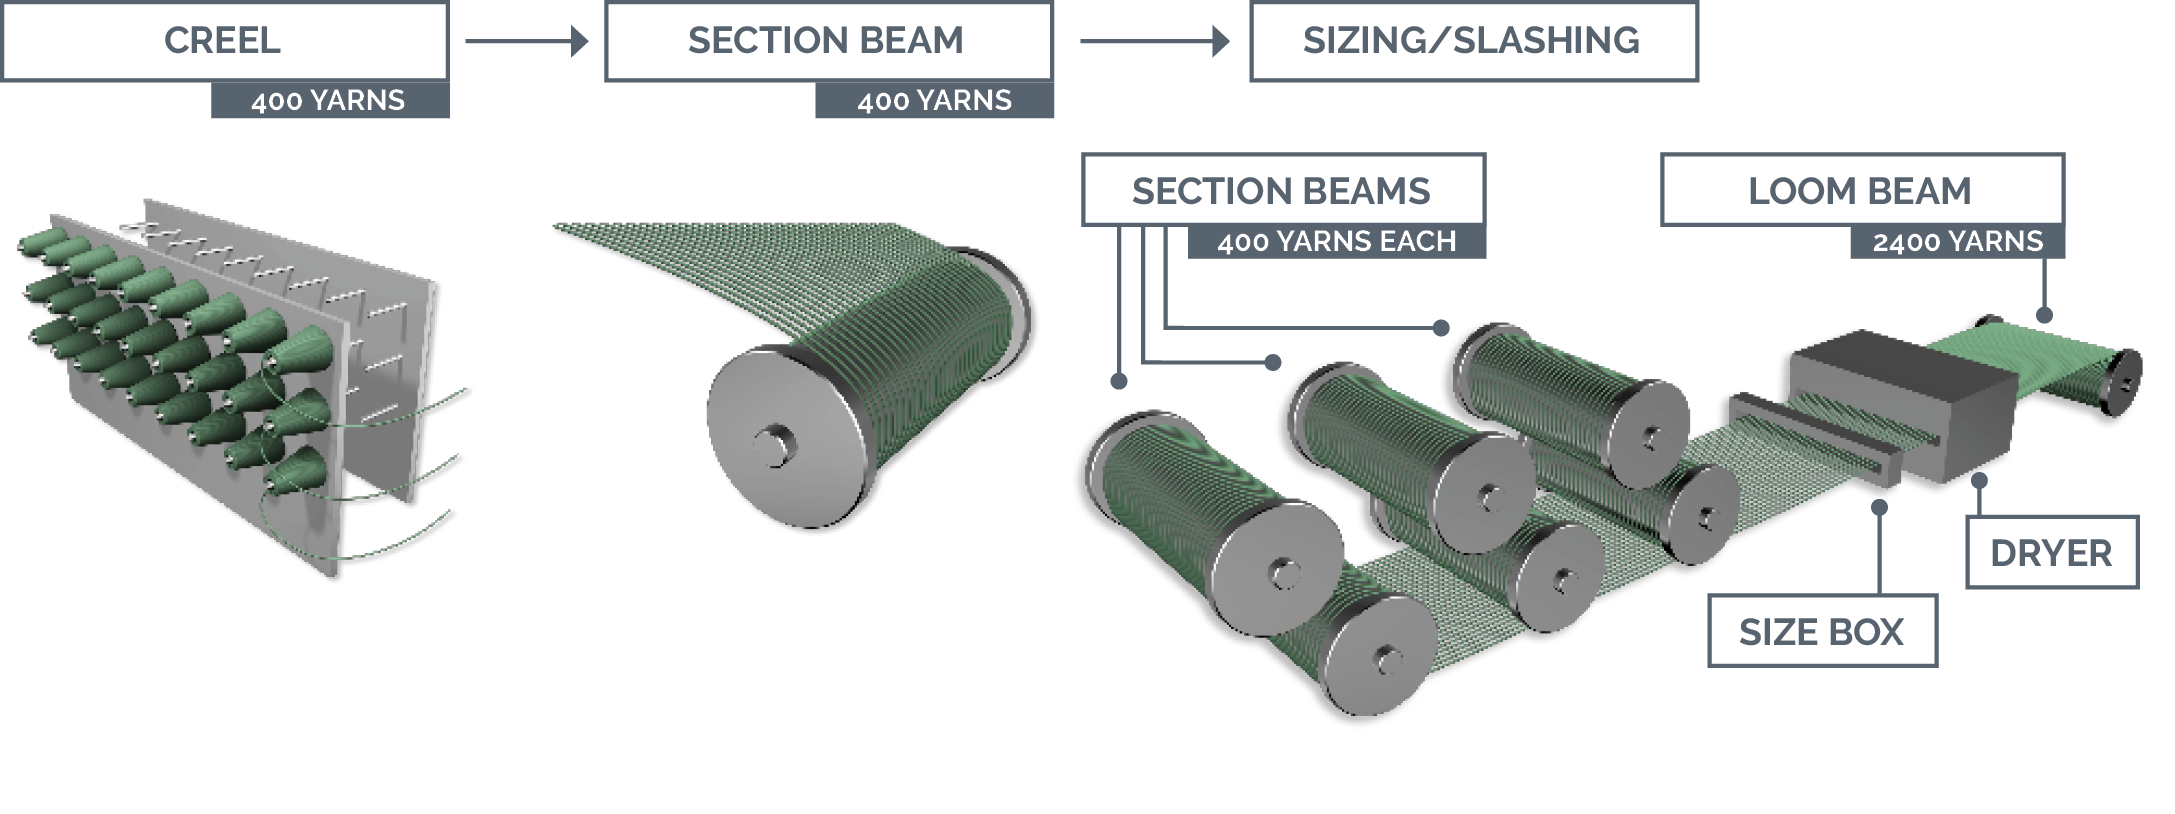
Warp preparation involves transferring yarns from a creel to section beams, then combining section beams to create the final loom beam.
It is critical that the warp yarns be wound with equal tension, that they not be crossed or rolled over one another, and that none be lost (broken and not tied back together). Various elements of the warping machine, such as tension devices, static eliminators, broken yarn detectors, wild yarn (yarn waste) detectors, eyelet boards, and expansion combs help ensure that the warping machine forms high-quality beams.
For most fabrics, all section beams must have identical yarn tension, uniform yarn count, and equal numbers of yarn ends
Indirect Warping
Indirect warping uses smaller creels with fewer yarn packages and therefore requires less space. Bands or sections of parallel yarns are wound onto a pattern drum. The bands are wound parallel to one another, contain the same number of yarns, and are identical in make-up.
Indirect warping is preferred for sample work, short runs, and fabrics with pattern stripes. The total required number of warp yarns is wound onto the drum, eliminating the use of section beams. However, the yarn on the pattern drum must be then be rewound onto a flanged loom beam suitable for further processing.
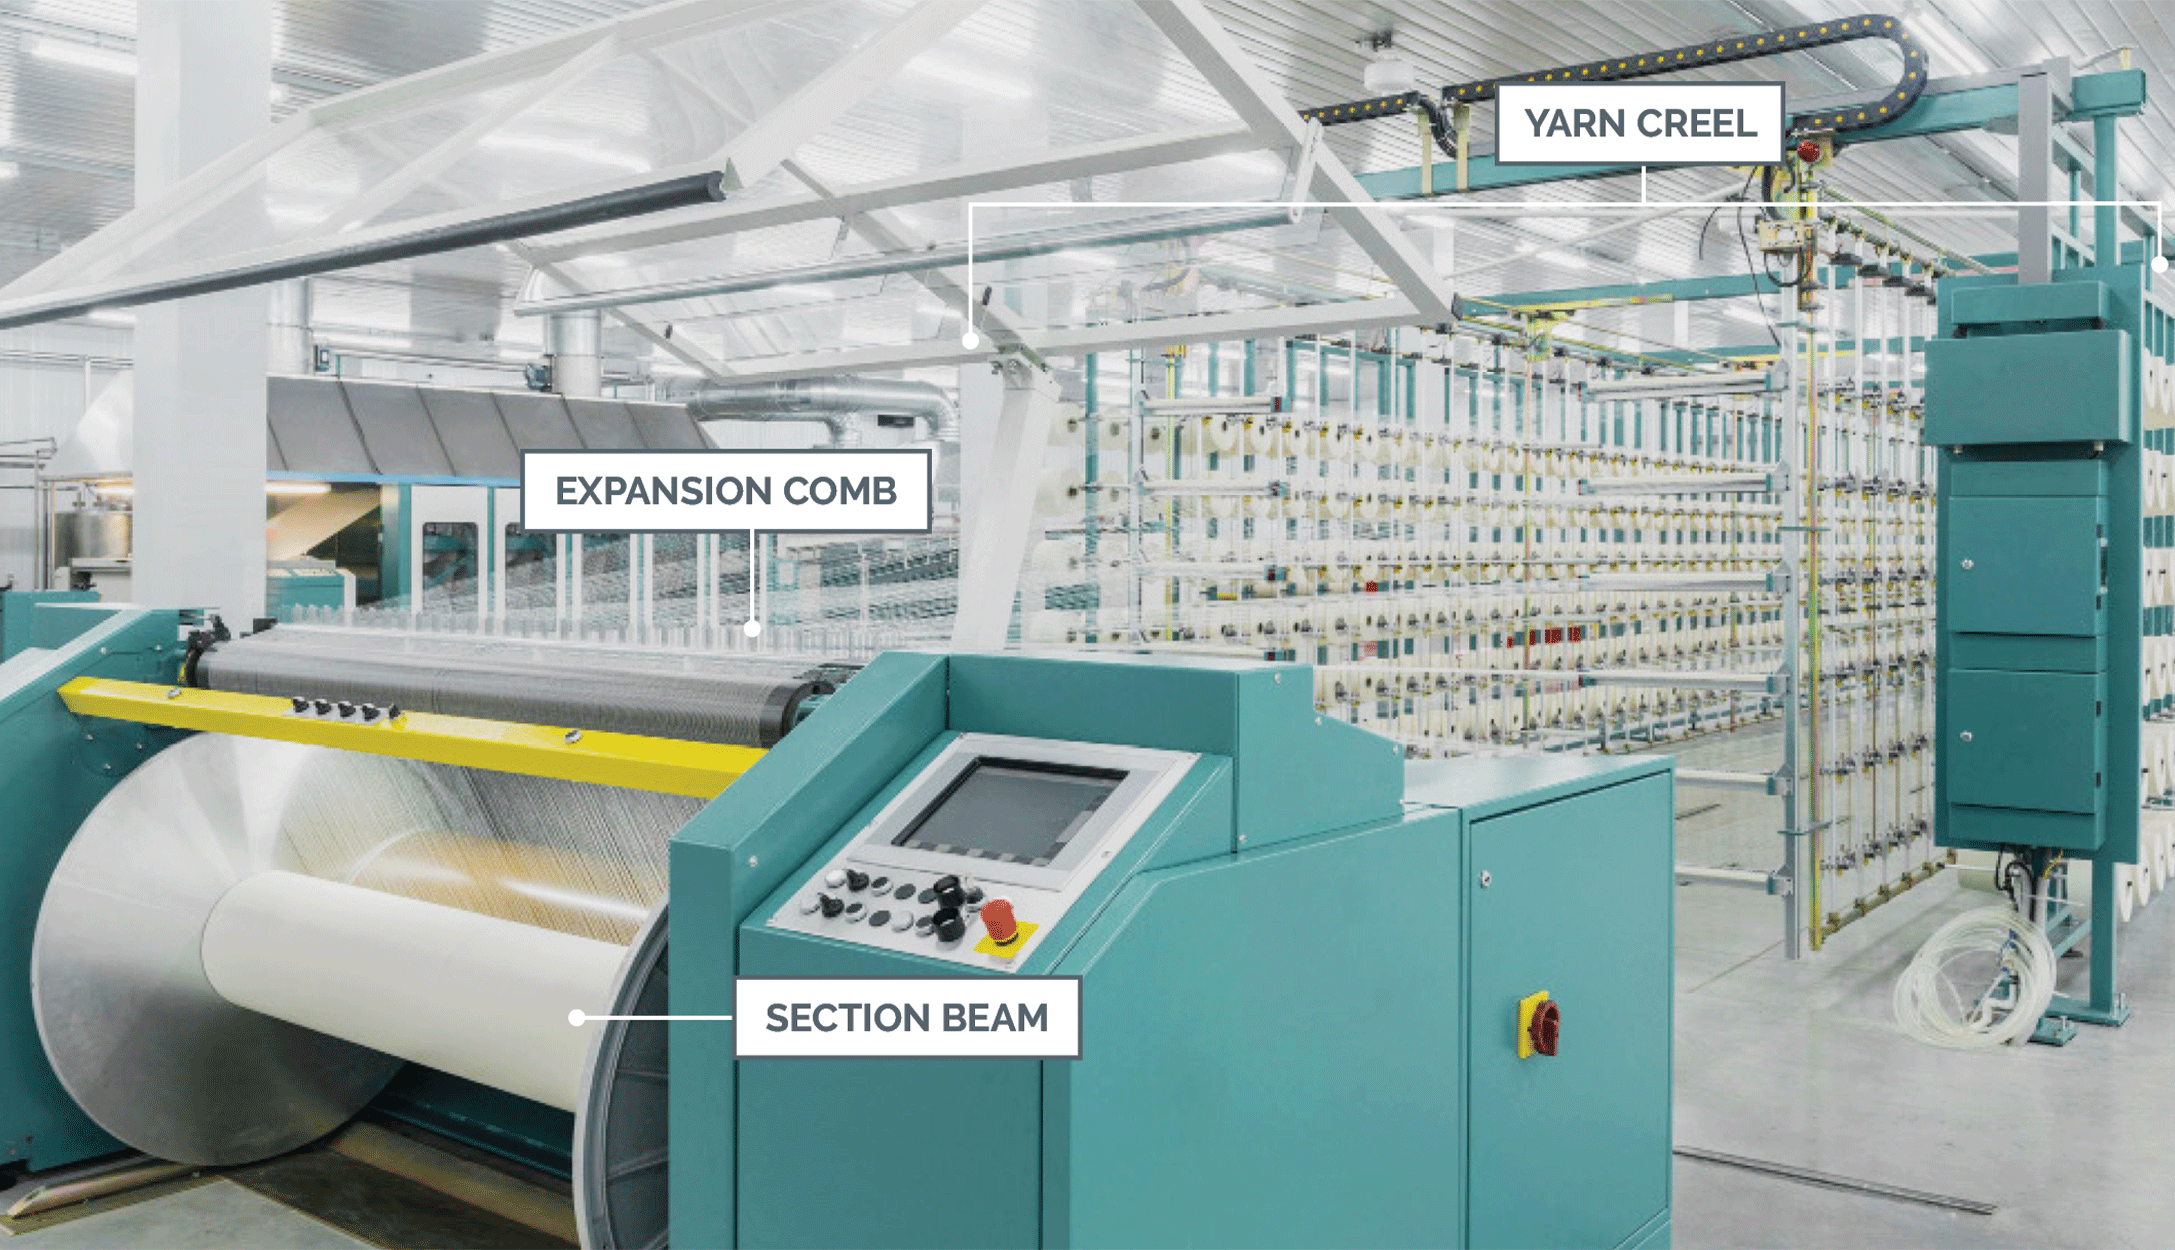
Direct warping from yarn packages to a section beam. The creel in the background holds 400 yarn packages. Yarn is pulled from the creel and wound onto the section beam. An expansion comb above the section beam helps keep the yarns straight and parallel as they wind onto the beam.
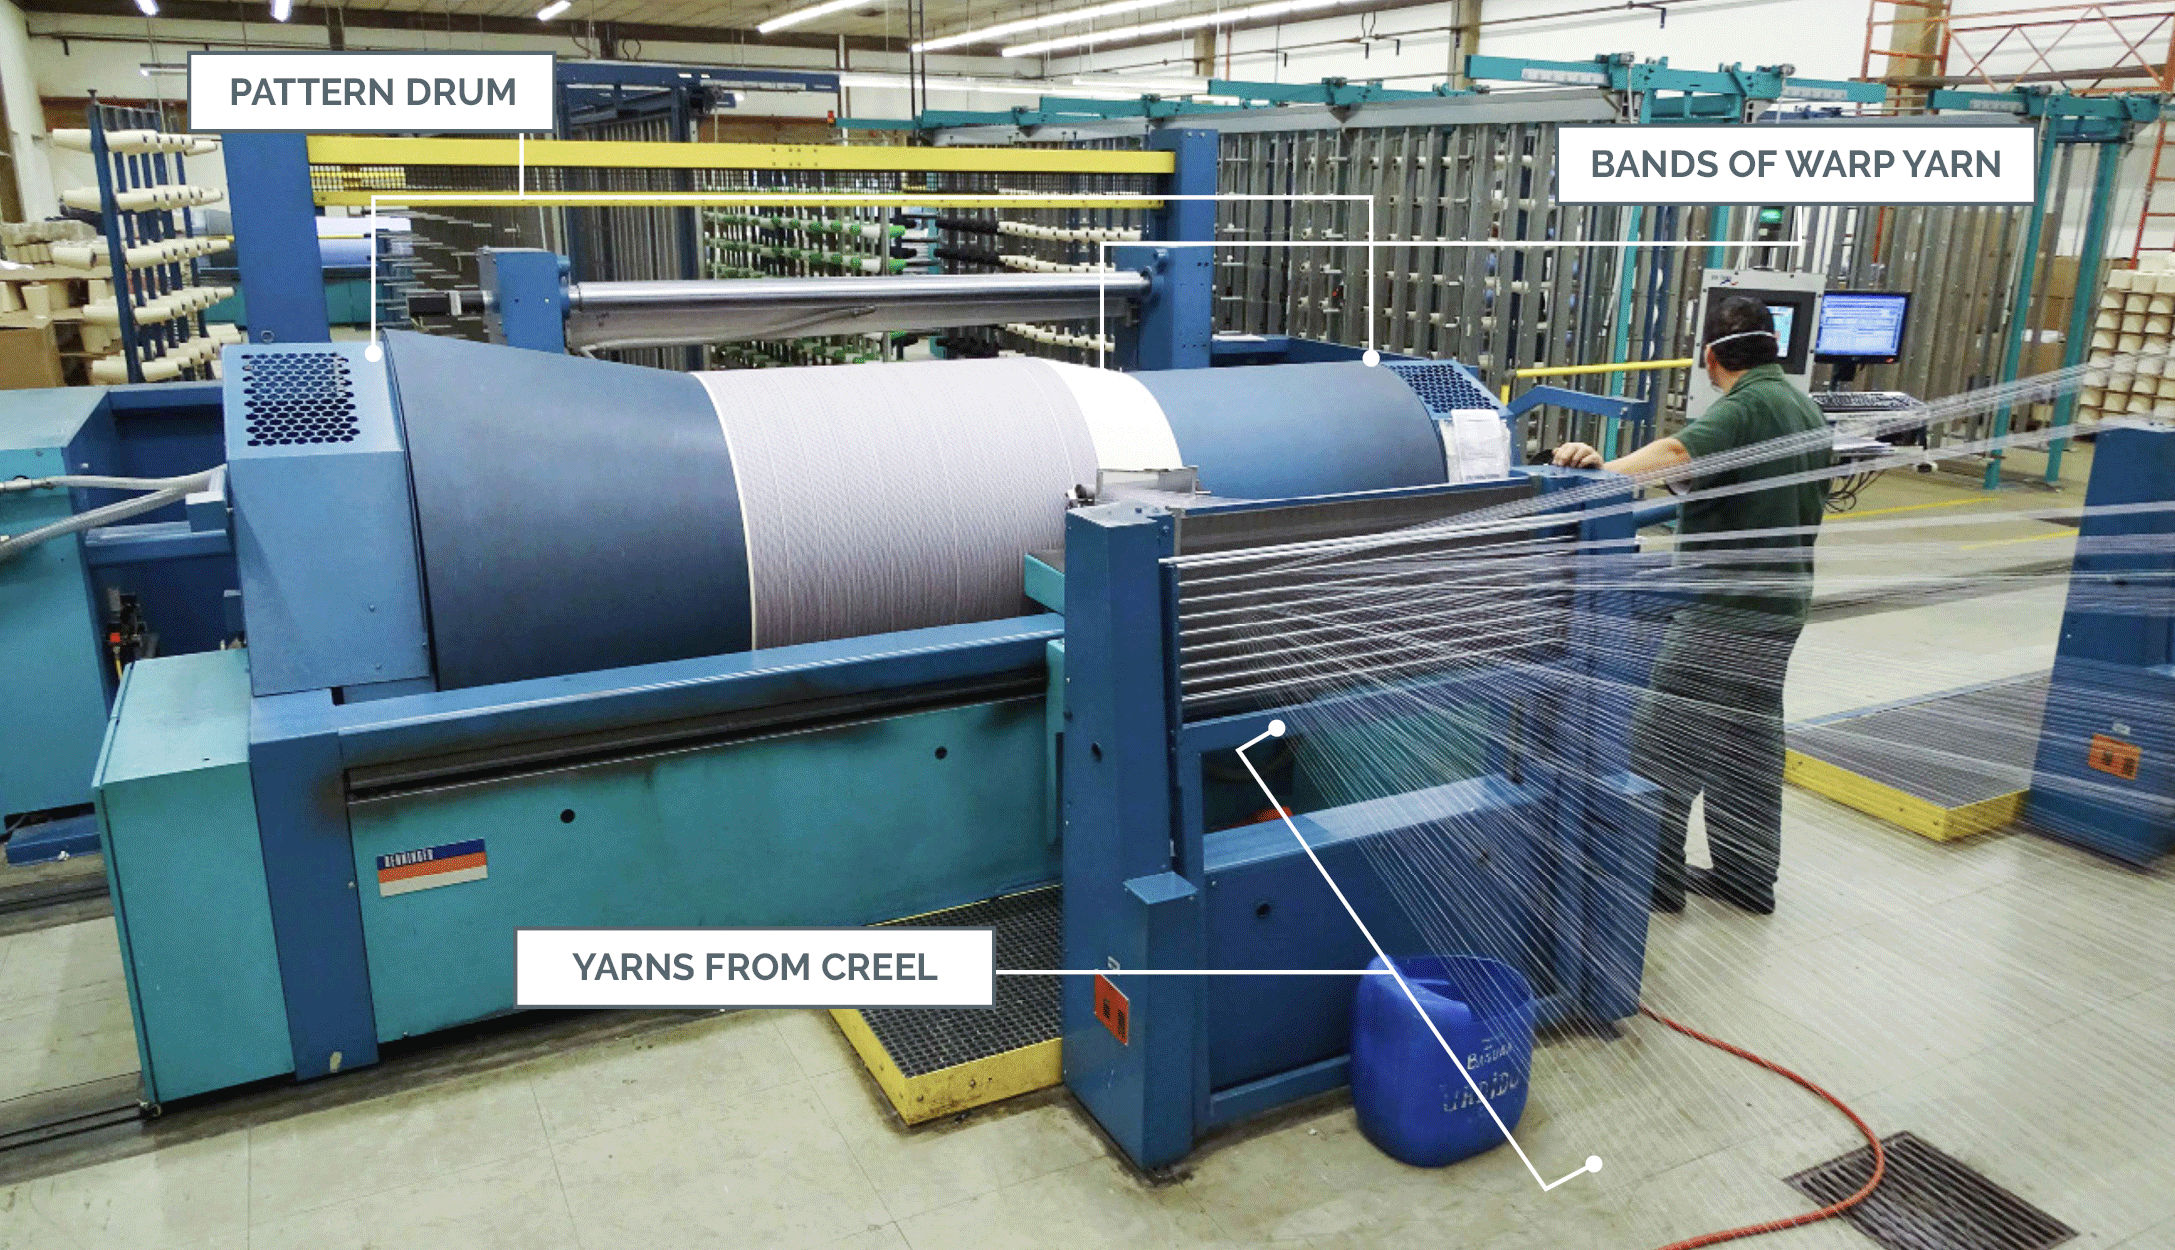
Indirect warping of bands or sections of yarn onto a pattern drum. All ends will be transferred to a beam ready for use at the loom.
Image courtesy of Creditex
Slashing
The purpose of slashing (or sizing) spun yarns is to encapsulate the yarn in a film of size in order to reduce yarn hairiness, improve yarn abrasion resistance, and increase yarn strength. For spun cotton yarns, the size solution is typically starch or a blend of starch and polyvinyl alcohol (PVA). In the case of filament yarns, the size is formulated, not to encapsulate the yarn, but to hold or glue the individual filament together. PVA is commonly used as size for filament yarns.
Slashing may not be necessary with coarse plied spun yarns or heavier-denier filament yarns, or in production of fabrics with a low-density warp (in which the yarns are not close to one another).
In the case of direct warping, the required number of section beams are placed on a slasher creel. These beams will be combined in the slashing process to create the final loom beam.

Reduction of yarn hairiness by slashing. Fibers that may stick out of the yarn could cause snagging and friction issues. Applying size chemistry encapsulates those fibers and adds strength so the yarn can withstand the rigors of weaving.
From the creel, the yarns flow through the size box where the liquid size solution is applied to the yarn. Size concentration, viscosity, and temperature must be constantly controlled. Yarn tension and yarn speed on the slasher must also be controlled. Squeeze rolls above the size box remove excess size and the pressure of these rolls helps control size add-on. The yarns are then dried as they move over steam-heated cylinders or cans. All of the warp yarns are then laid in parallel fashion through an expansion comb and wound onto a loom beam. The size remains on the warp yarns through the weaving process then is removed from the fabric in a preparation process known as desizing. Some sizes, such as PVA, can be reclaimed, but starch cannot be reclaimed.

The parts of a slasher, detailing the flow of yarn through the slashing process.
Drawing-In
The last warp preparation step is to draw each warp yarn through the appropriate loom elements. Each warp yarn has a dedicated drop wire, heddle, and dent in the reed that relates to the fabric design that will be woven. If a yarn breaks, the associated drop wire makes an electrical contact that stops the weaving machine. The heddles are necessary to control the weave design, and the reed helps to space the yarns equally and provide a means of pushing, or beating, each weft yarn into the fabric. Each opening or space in a reed is called a dent. Drawing-in is often done by hand, but can be done electronically. This is a critical step in the preparation process. If all yarns are drawn in properly, then weaving will be more efficient, fabric design will be accurate, and the overall fabric appearance will be acceptable.
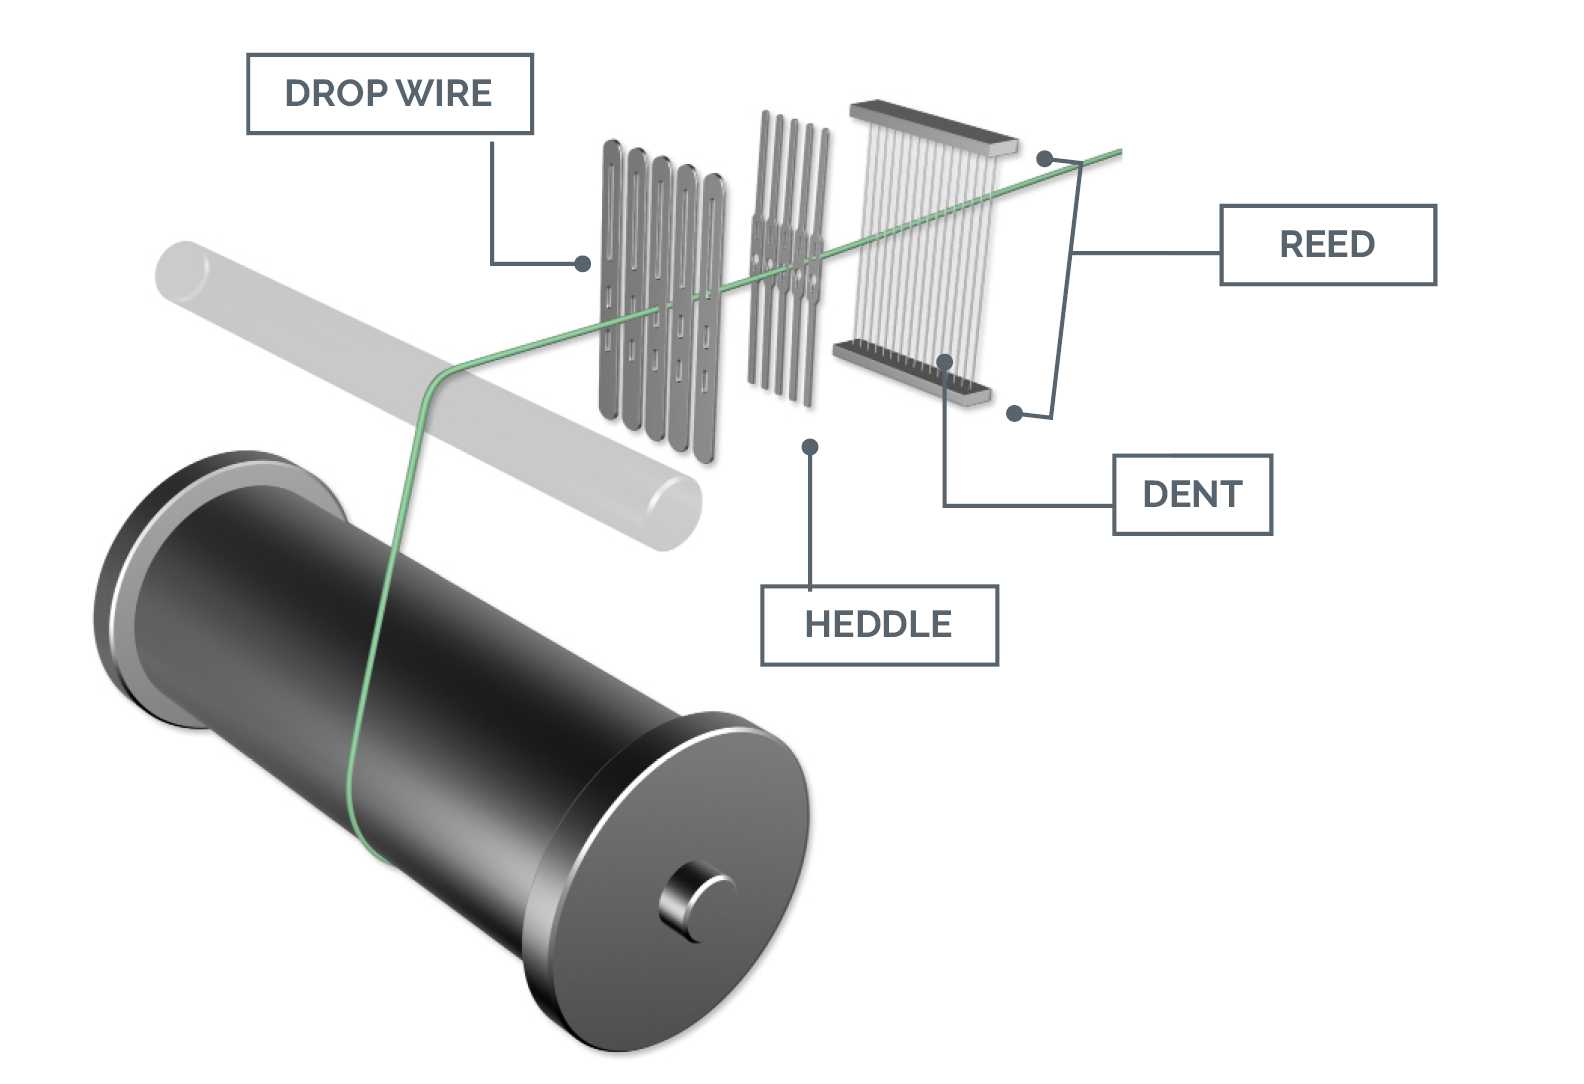
A warp yarn is drawn through a drop wire, heddle, and reed dent.
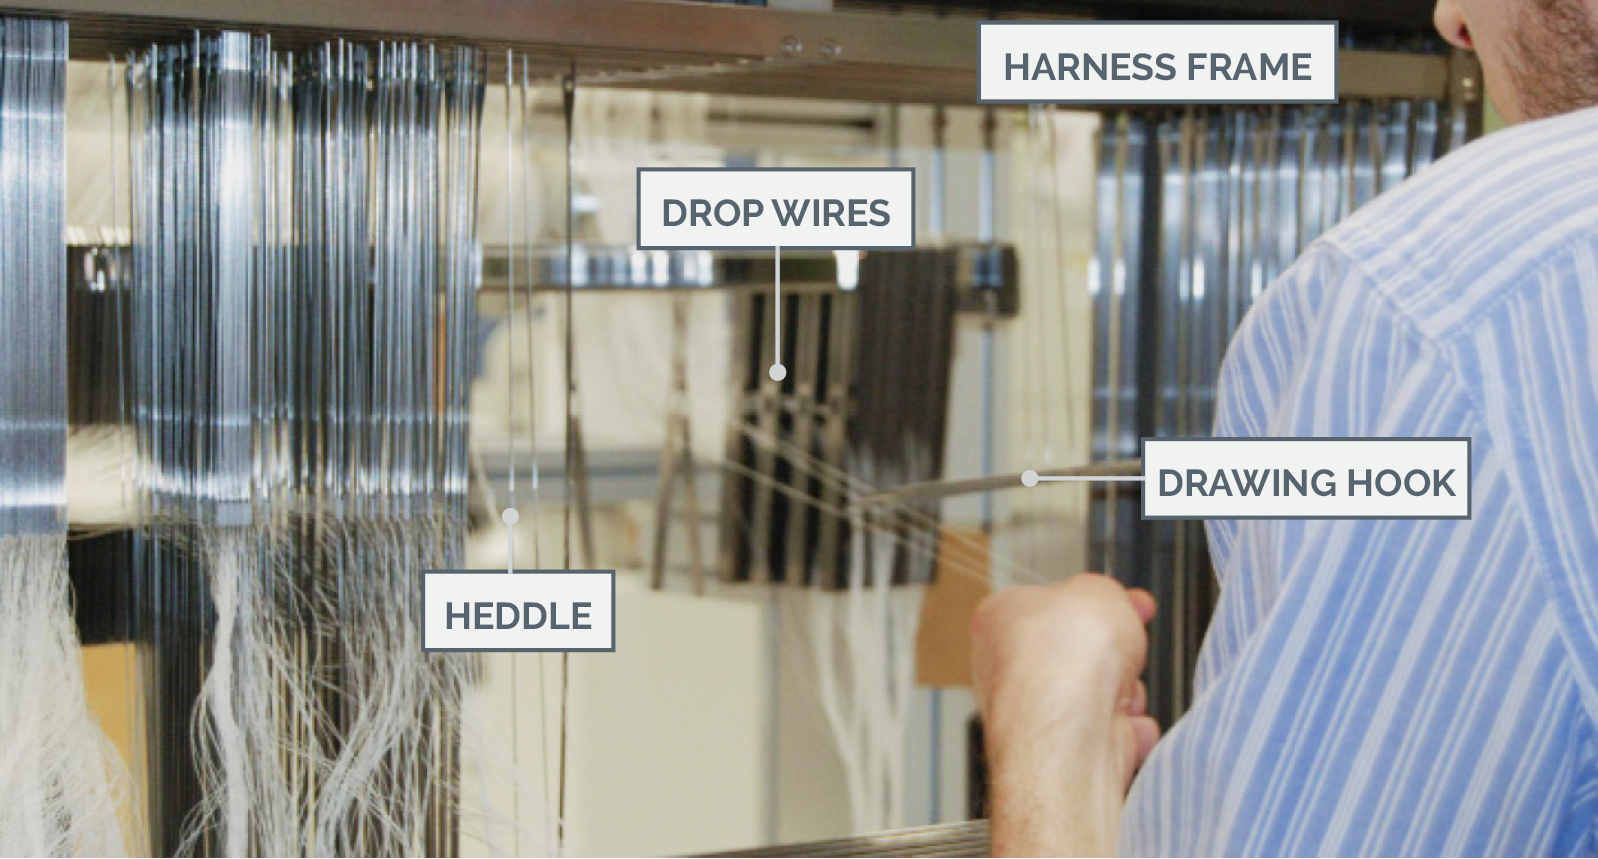
A sample loom being hand-drawn using a 3-prong hook to help speed up the process. The drop wires and heddles are being drawn simultaneously, and the reed will be drawn in separately. A tedious process, this requires extreme attention to detail to make sure that each individual warp yarn is drawn through the corresponding elements of the loom correctly.
Tying-In
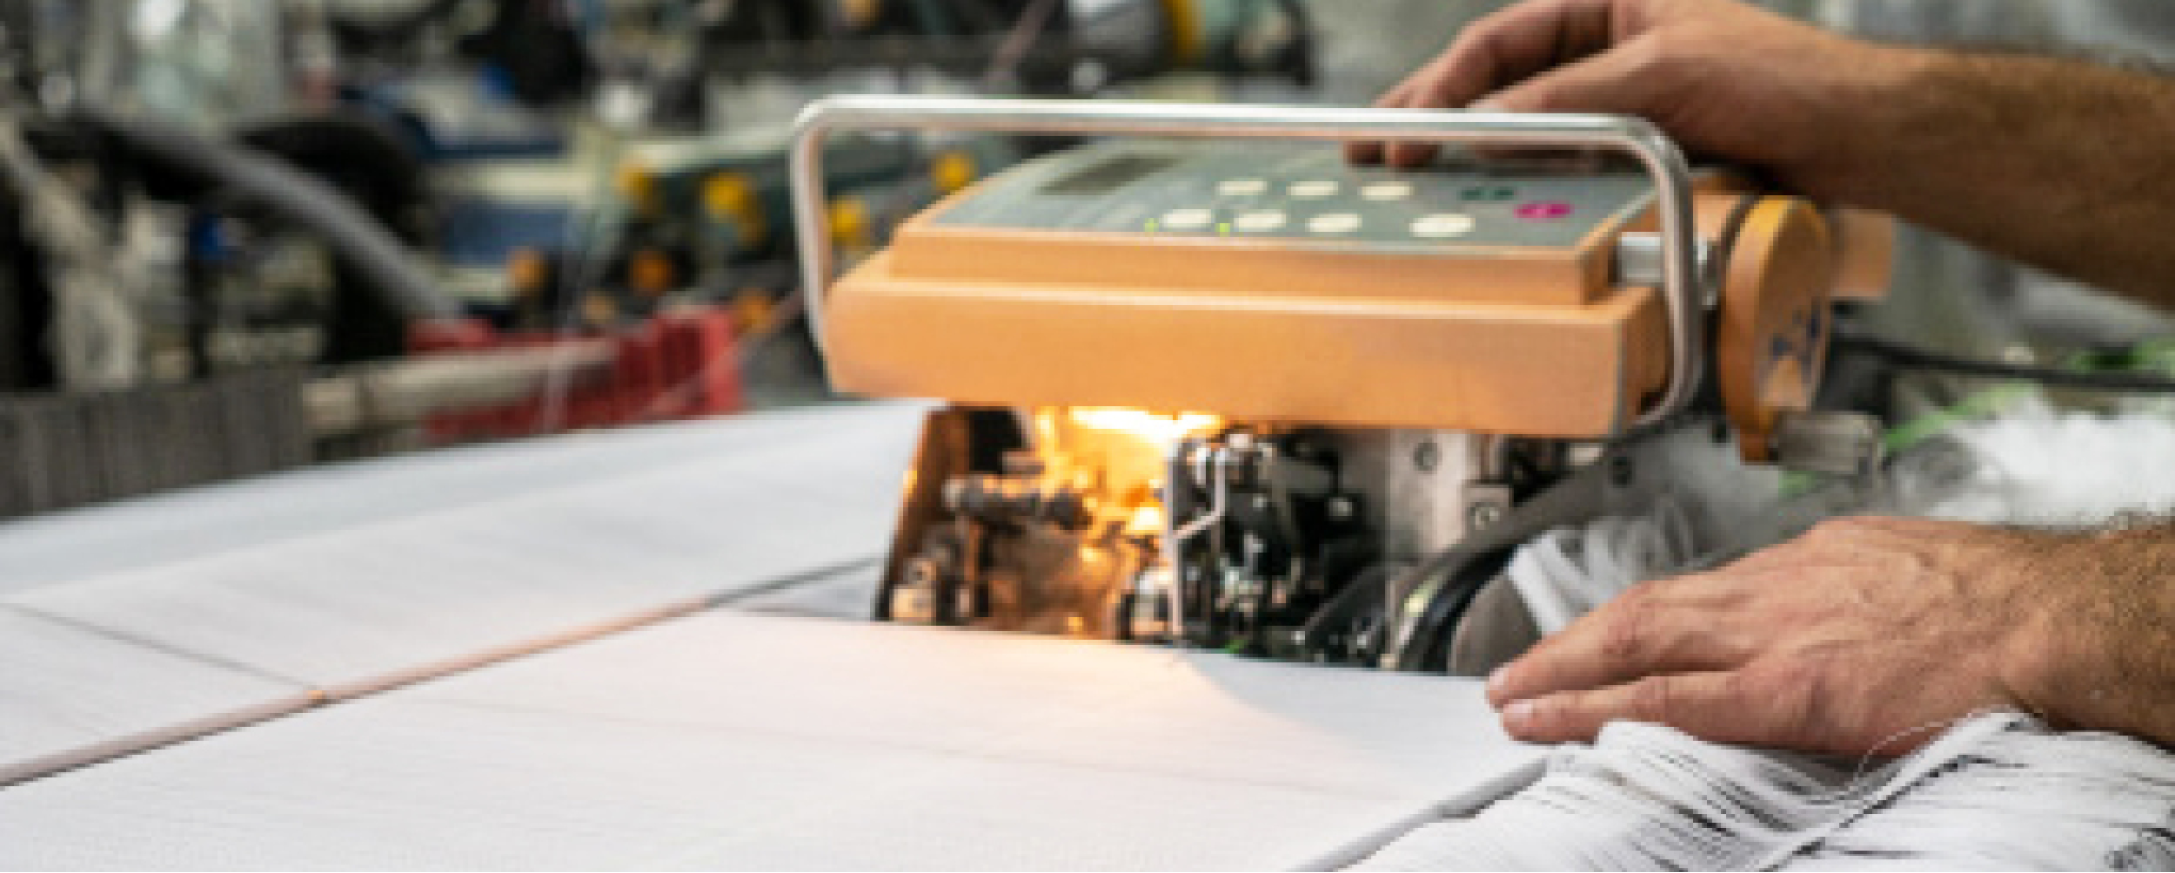
In mass production of a fabric in the same fabric design, it is not necessary to redraw the warp yarns in order to replace a loom beam that has run out with a new beam of the same style. Instead, the much faster process of tying-in can be used. A tying-in machine (or knotter) takes each end of warp yarn on the existing loom beam and ties it to the associated yarn on the replacement loom beam.
Tying-In Machine
Five Basic Motions of the Weaving Loom
Forming a woven fabric requires five basic loom functions or motions: shedding, filling insertion, beatup, let-off, and take-up.
The first three motions take place in a set time interval and follow one another sequentially. Because these motions cannot happen simultaneously, conventional weaving is a single-phase process. Some machines can insert a number of picks almost simultaneously into a number of shed openings and beat each pick into the fabric. However, these multi-phase (multi-shed) machines have limited design potential and generate more lint when weaving spun yarns.
Shedding
Shedding separates all the warp yarns into a weave shed (opening) formed between a top shed (yarns that are raised) and a bottom shed (yarns that are not raised).
Each weft yarn is inserted into the opening created by shedding of the warp yarns.
As part of the drawing-in process, warp yarns are drawn into heddles, which are held in harnesses. Harnesses are frames that hold a set number of heddles, depending on the fabric design being woven.
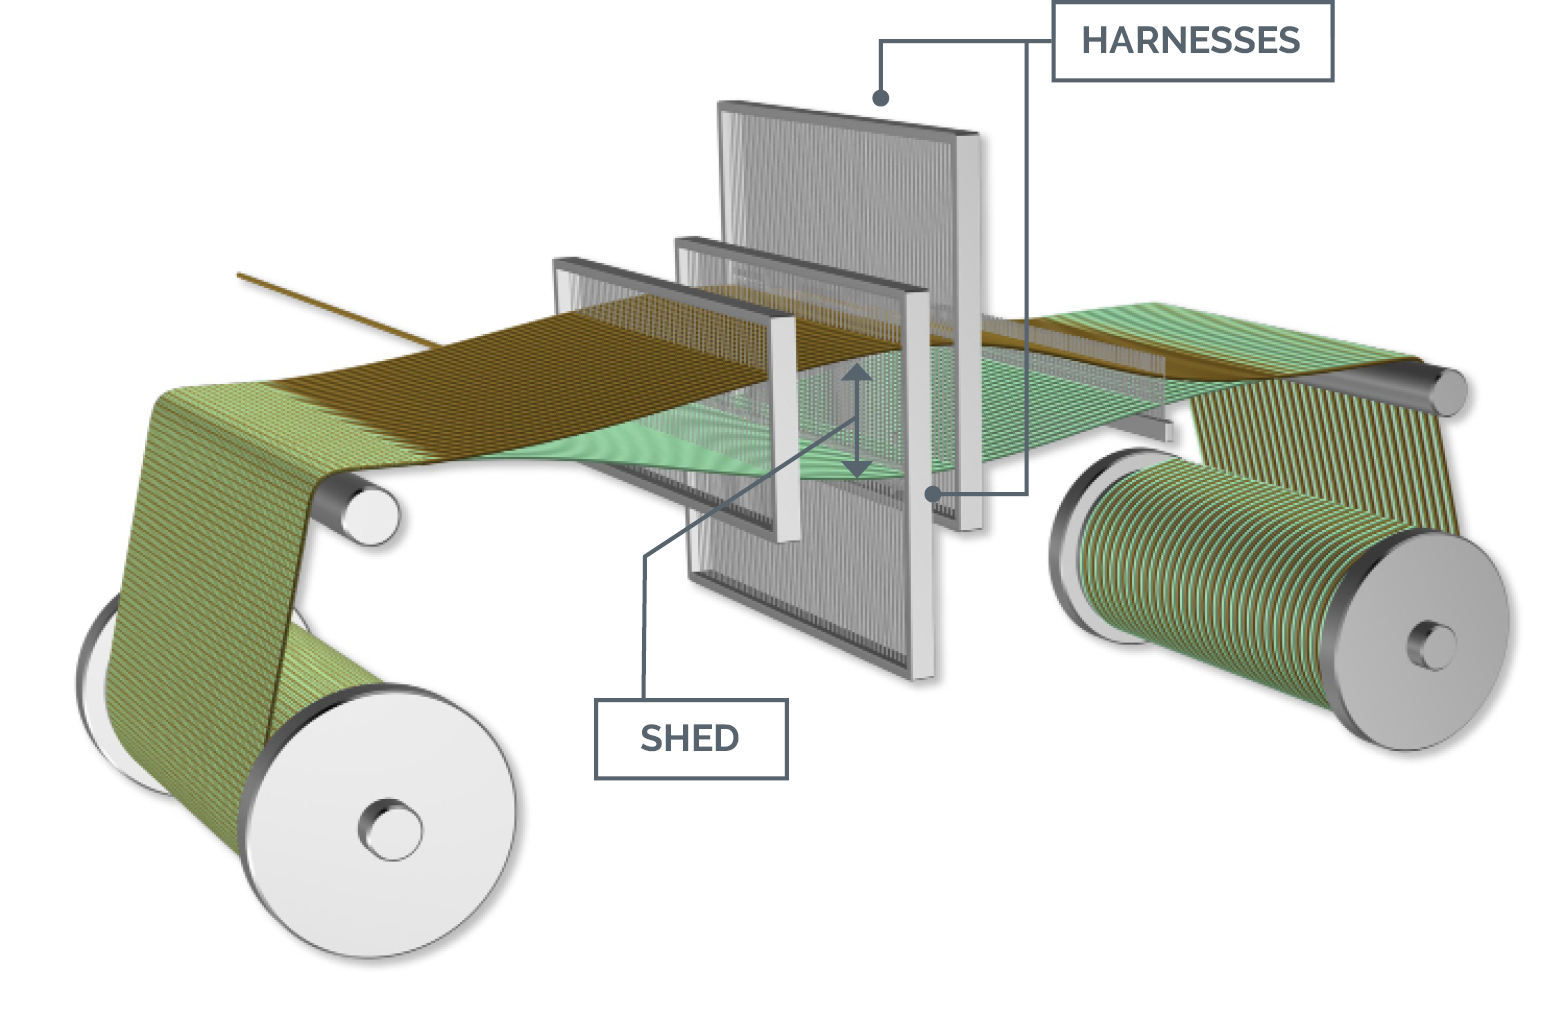
Each individual heddle is a long, thin device with an eye (similar to the eye of a needle). The harnesses group heddles together into sections of warp yarns that weave the same—each yarn that is in a heddle in a given harness will raise and lower with the other yarns in the same harness. According to the fabric design, harnesses will be raised and lowered to create the shed which, in turn, allows for filling insertion.
There are three general methods of shedding, each with specific design capabilities: cam shedding, dobby shedding, and jacquard shedding.
Cam Shedding
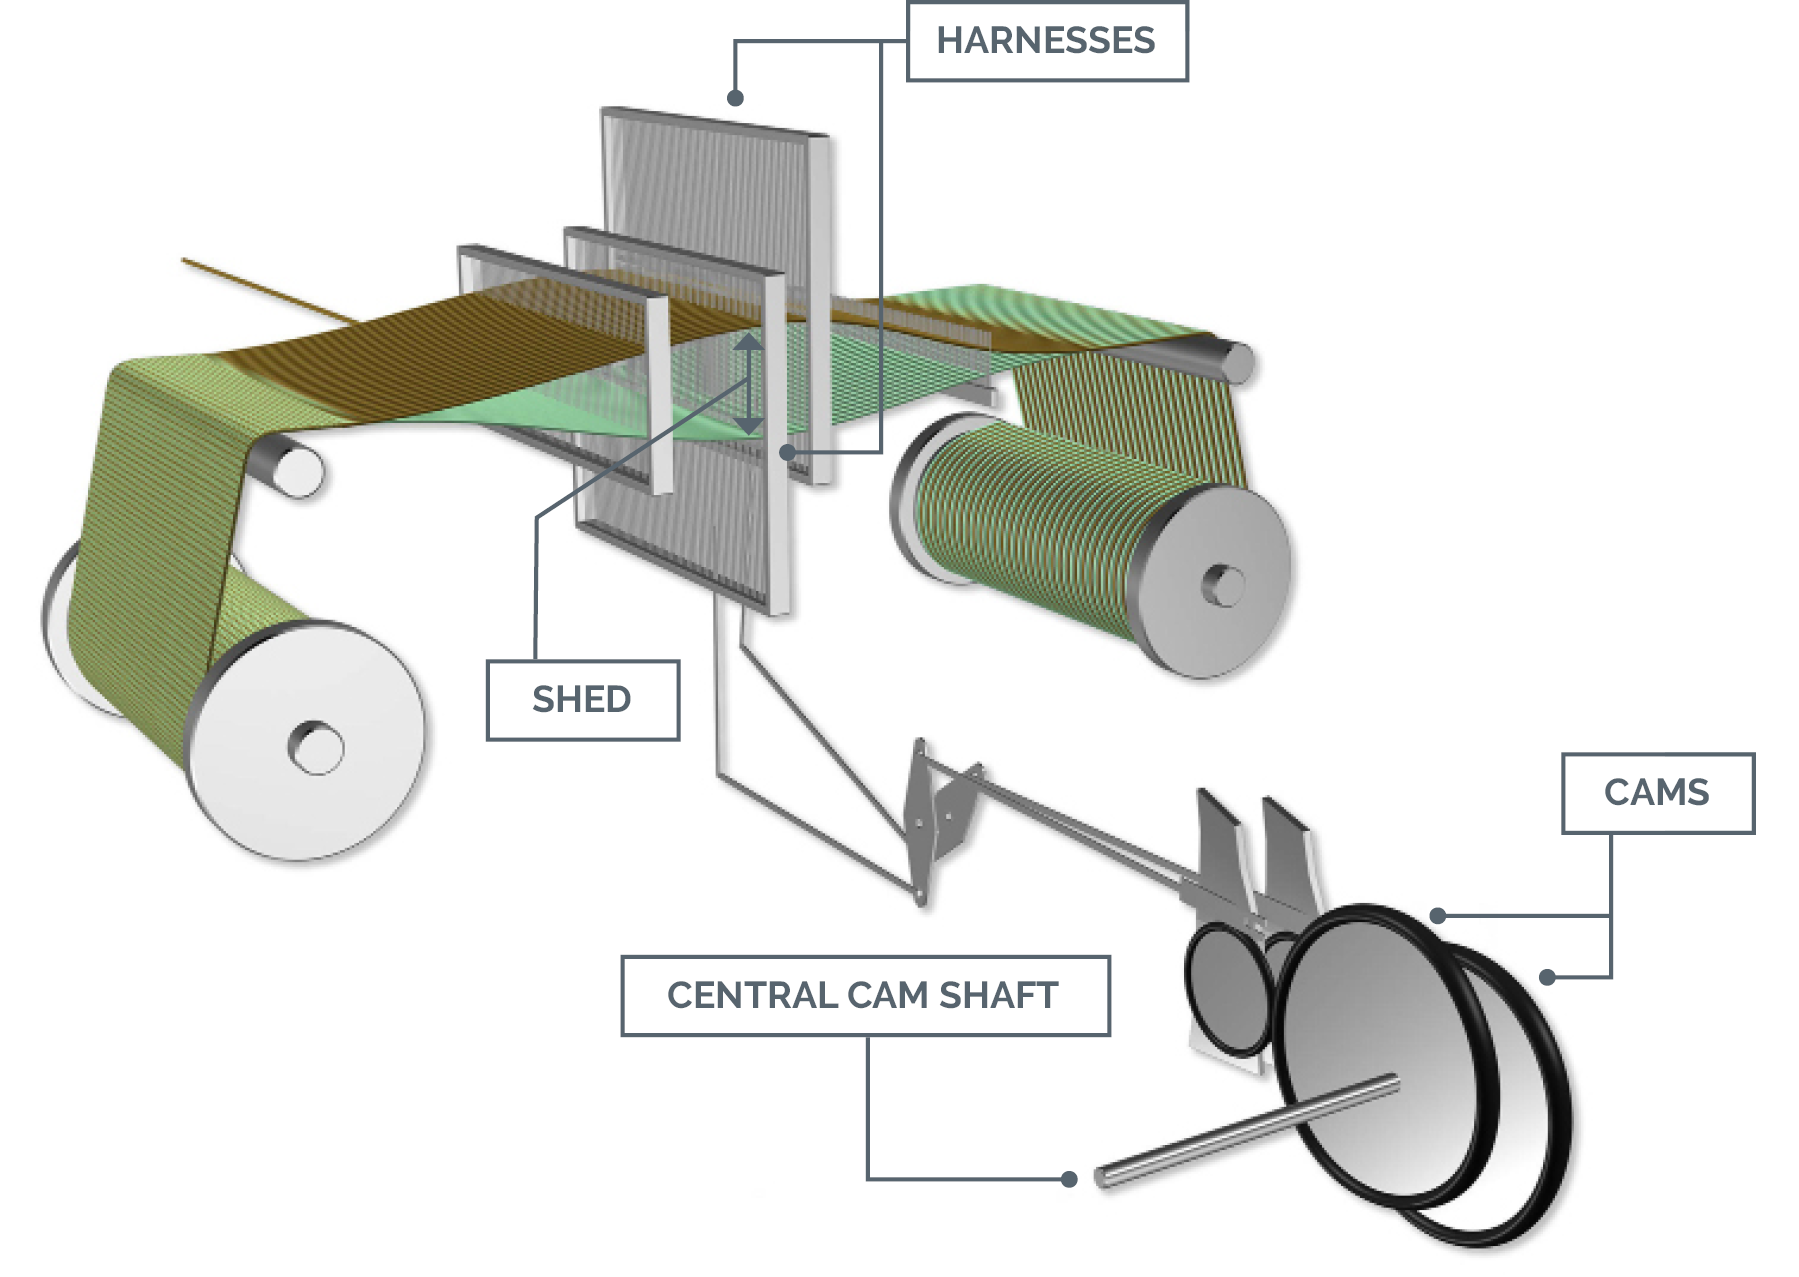
Cam shedding typically uses 6 to 8 harnesses, though sometimes up to 12. Each harness is controlled by a rotating cam that forces the connected harness to move up and down in a prescribed manner to produce a particular fabric design.
The profile or shape of each cam and its position on the camshaft dictate the movement of the connected harness.
Dobby Shedding
Dobby shedding typically uses 12 to 32 harnesses, which allows for a broader range of woven designs than cam shedding. In addition to the basic weaves, dobby shedding makes it possible to weave small geometric figures, spot weaves, and more complex pattern stripes.
Historically, dobby weaving employed a chain of wooden bars with pegs inserted along the length of the bar. Pegs were placed in designated slots and would trigger a mechanism that would raise the corresponding harness. The arrangement of the pegs in the wooden bars was termed the “peg plan” or “chain plan.”
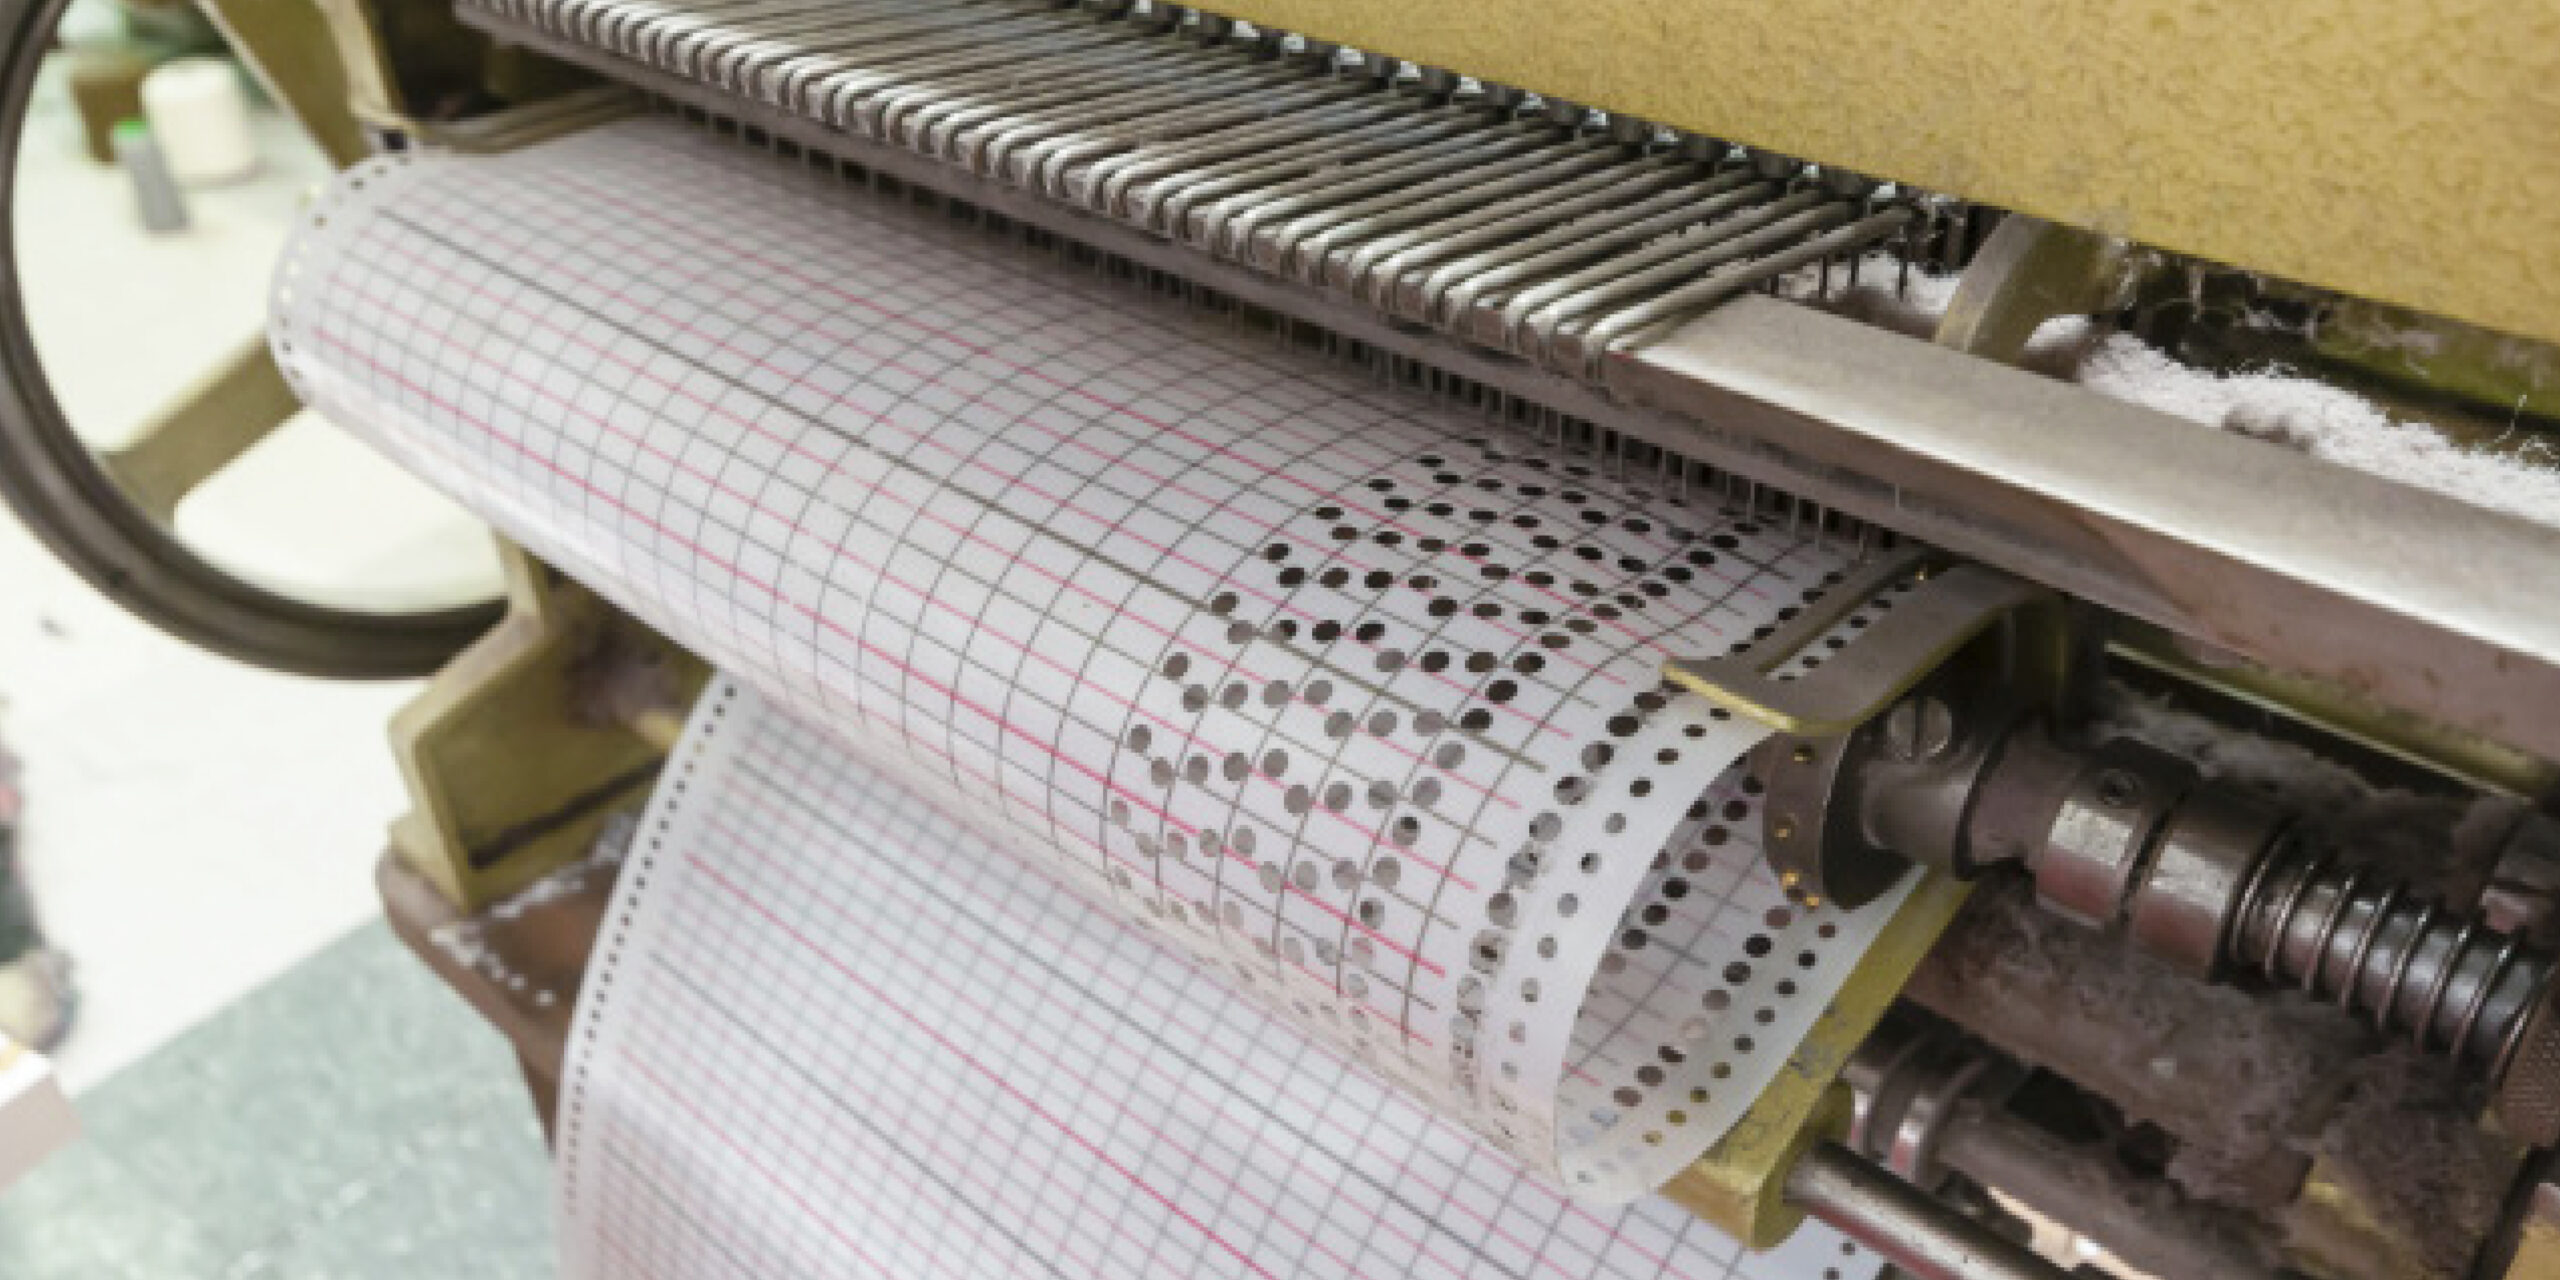
As technology progressed, chains of wooden bars were replaced with plastic sheets with punched holes. A punched hole allows a pin to penetrate the sheet and initiate lifting of the associated harness. The weave design is controlled by the positioning of the holes in the pattern sheet.
Jacquard Shedding
Instead of using harnesses to control the weave design, jacquard shedding employs draw (or harness) cords that drop down from a jacquard head; each cord is connected to an individual heddle or a small group of heddles. This type of control makes it possible to form large design repeats and very intricate designs.
A jacquard machine will have a certain number of hooks that control the lifting of warp yarns. Having more hooks makes it possible to weave larger design repeats and more intricate designs.
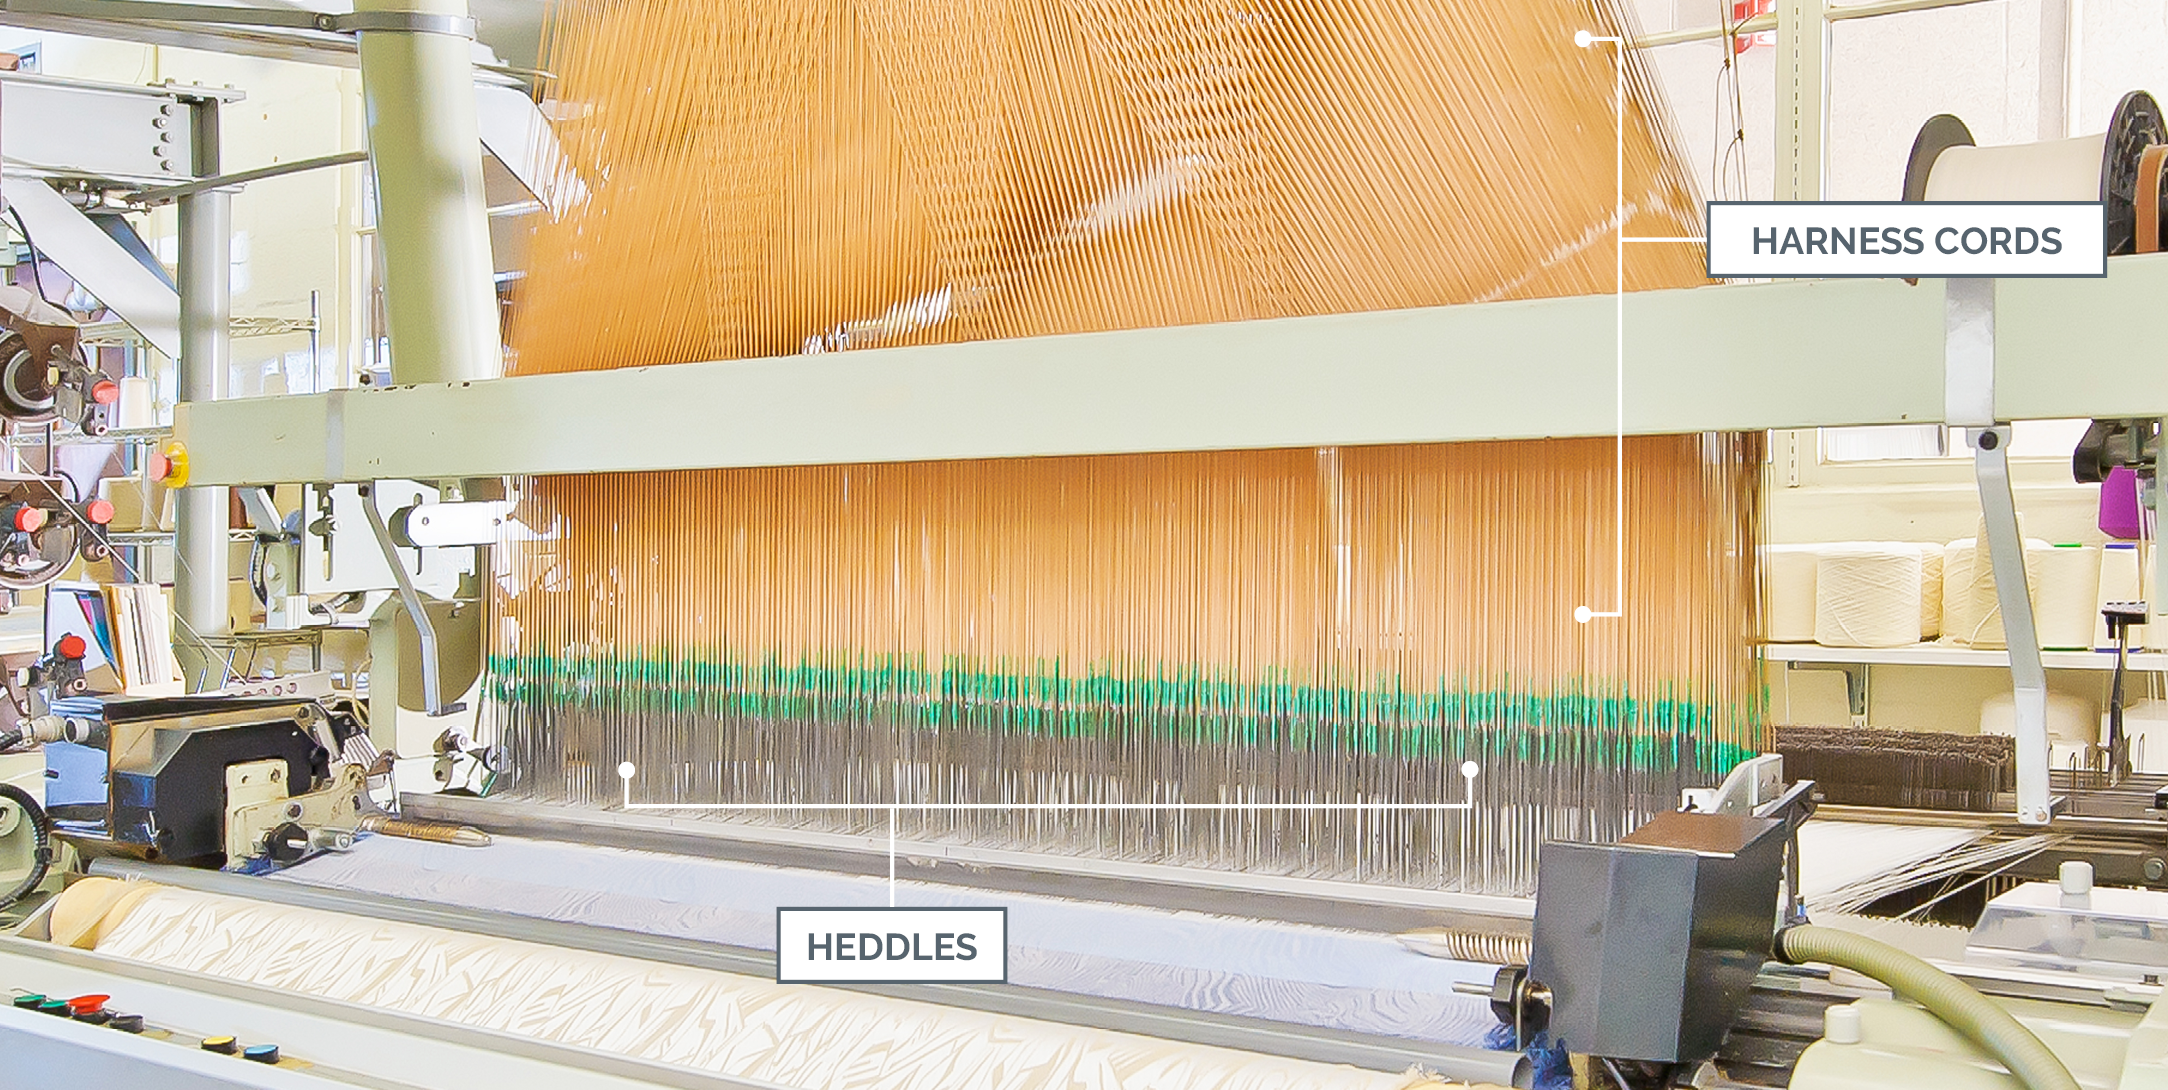
Jacquard loom weaving fabric with a large-scale pattern.
Filling Insertion
The filling, or weft yarn, can be inserted into the woven fabric by various methods. The oldest method, using a shuttle, has been replaced today by various shuttleless methods which include: rapier, projectile, air jet, and water jet filling insertion.
Shuttle Weaving
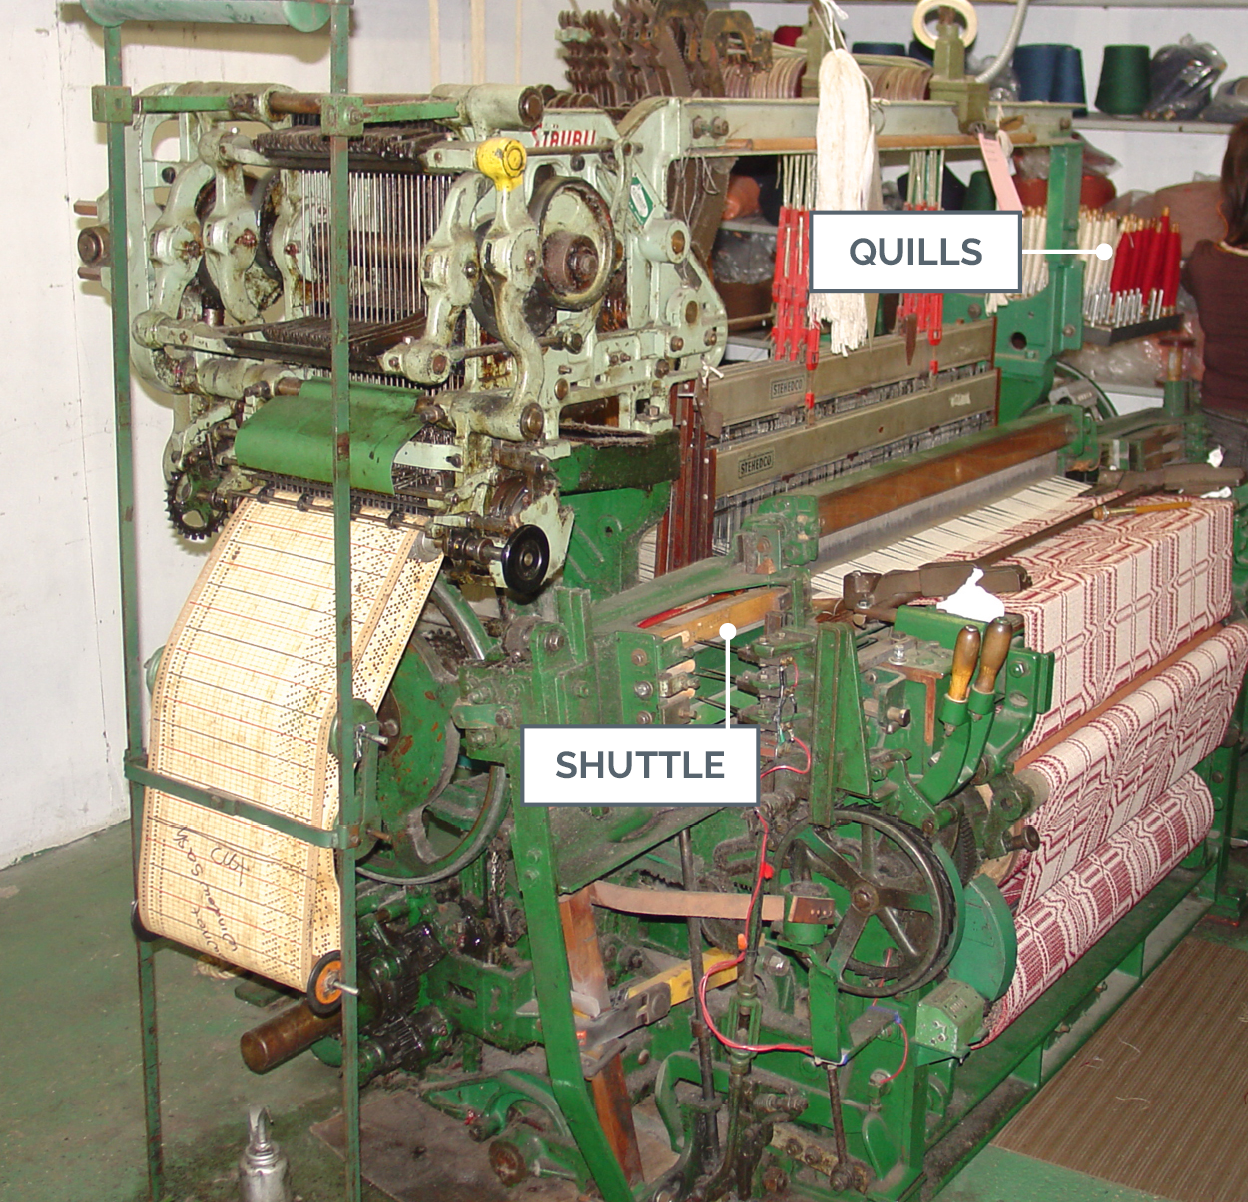
Shuttle weaving uses a device (the shuttle) to carry a package of yarn (a quill) through the warp shed, inserting the filling yarn as it traverses the width of the machine. The quill contains a small amount of filling yarn which unwinds from the quill as the shuttle goes back and forth through the separated warp yarns.
A fresh quill of yarn is inserted just before the current quill is completely empty. Shuttles typically are inserted at the rate of 180 to 220 times per minute, referred to as picks per minute. Some shuttle machines are still in operation, weaving vintage denim and specialty fabrics. The shuttle is tapered on each end for easy entrance into and exit out of the weave shed.
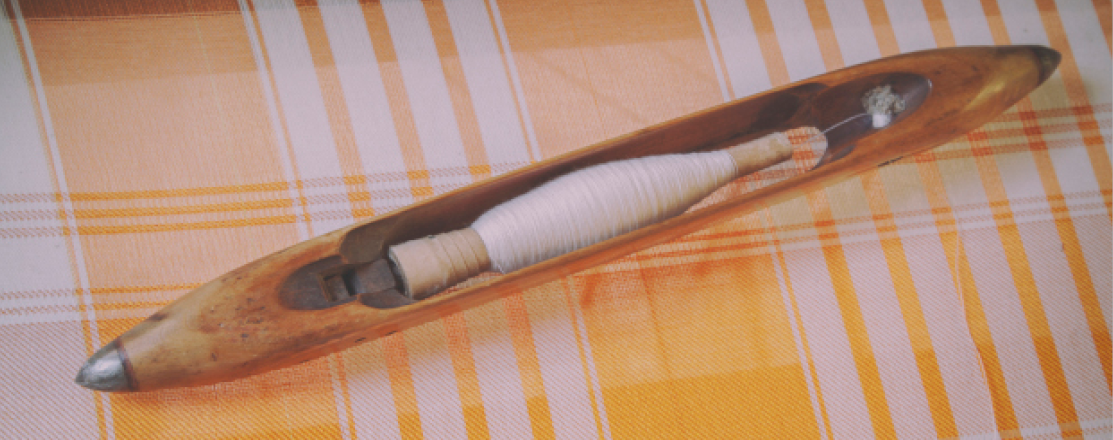
Shuttle Loom
A shuttle loom weaving heritage fabrics. Quills are loaded on the right side of the loom with the two filling colors—red and white.
The shuttle is housed on the side of the loom, and will traverse the width of fabric during weaving, inserting weft yarn as it moves back and forth. Shuttle weaving is the only filling insertion method that inserts yarn from both sides of the fabric, creating a clean woven selvage on both sides.
Rapier Filling Insertion
Rapiers are rigid bars or flexible tapes with a gripper system that grips the yarn and inserts it across the warp shed. The grippers typically are opened and closed with the aid of cams or springs.
The single rapier inserts the yarn across the complete width of the fabric and returns empty before insertion of the next pick. The double rapier uses two rapiers on either side of the loom. One rapier (the giver) carries the yarn halfway across the shed, where it meets the other rapier (the taker) and transfers the yarn. The yarn is carried to the other side of the fabric by the second rapier, as the first rapier returns to gather the next pick.

Double Rapier. The rapier on the left is the giver and carries the yarn from the package. The rapier on the right is the taker that retrieves the yarn with a hook and carries it across the remaining width of the fabric.
Each rapier then retracts from the weave shed to complete the process. The insertion process is typically repeated 350 to 600 times per minute, depending on machine width and model.
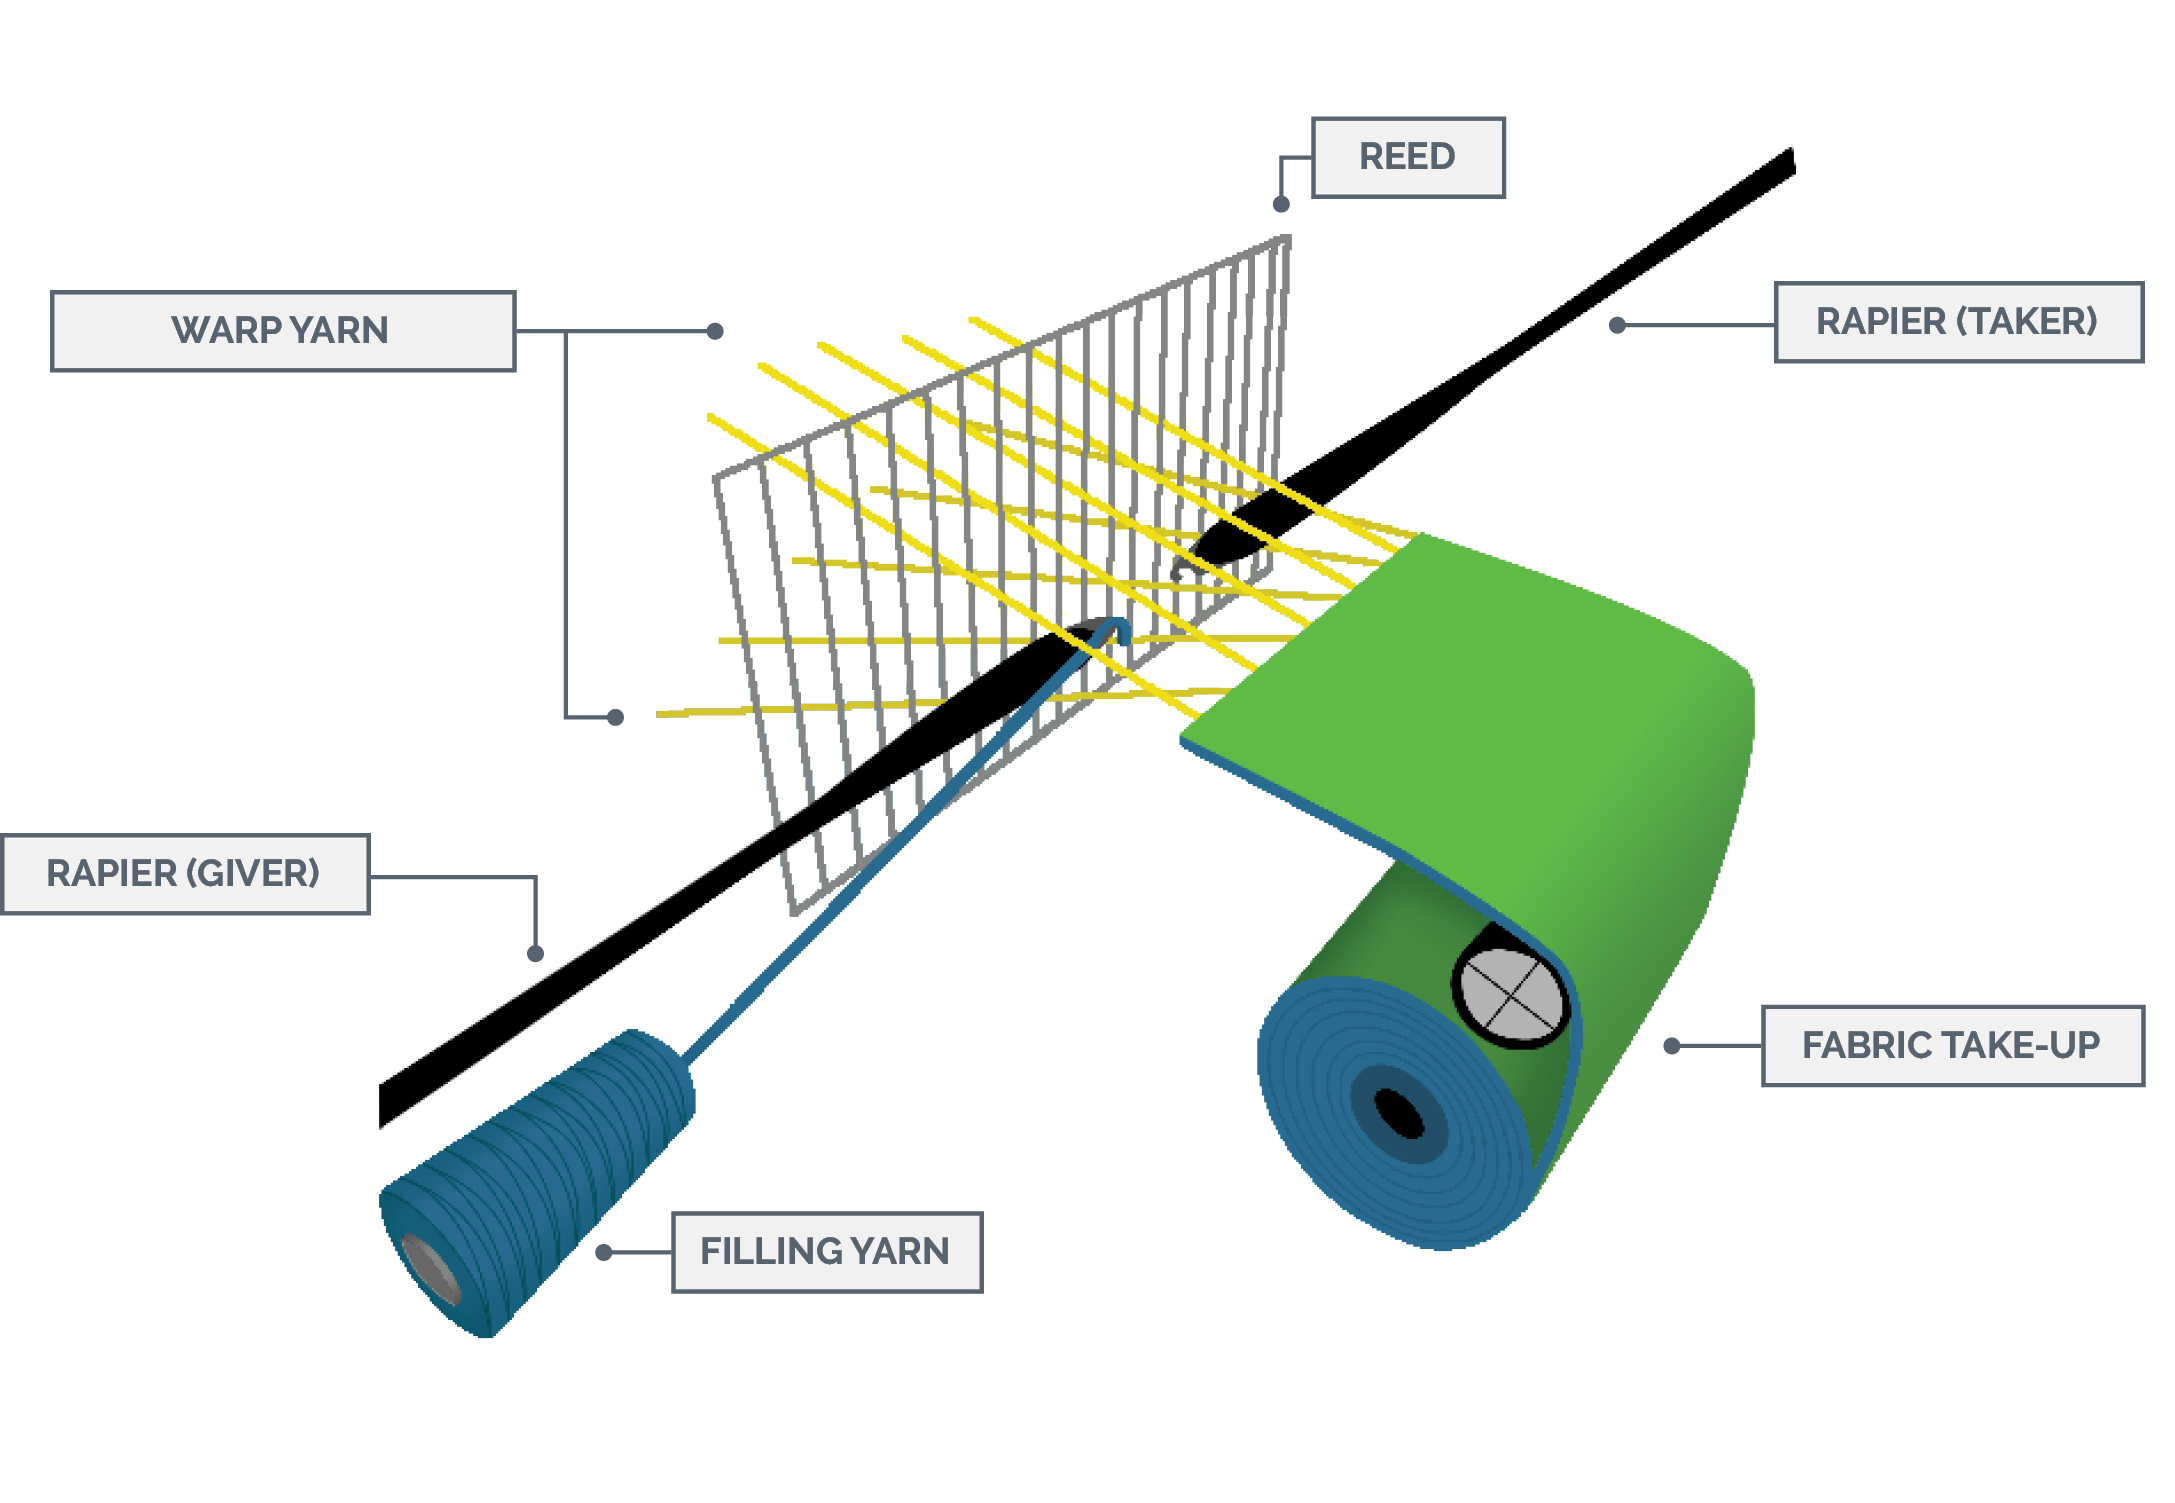
Double Rapier Weaving. The rapier on the left (the giver) takes the filling yarn from the package and transfers it to the rapier on the right (the taker) in the middle of the loom. The taker pulls the filling yarn the rest of the width of the fabric, then exits the shed, allowing the reed to beat the filling yarn into the fabric
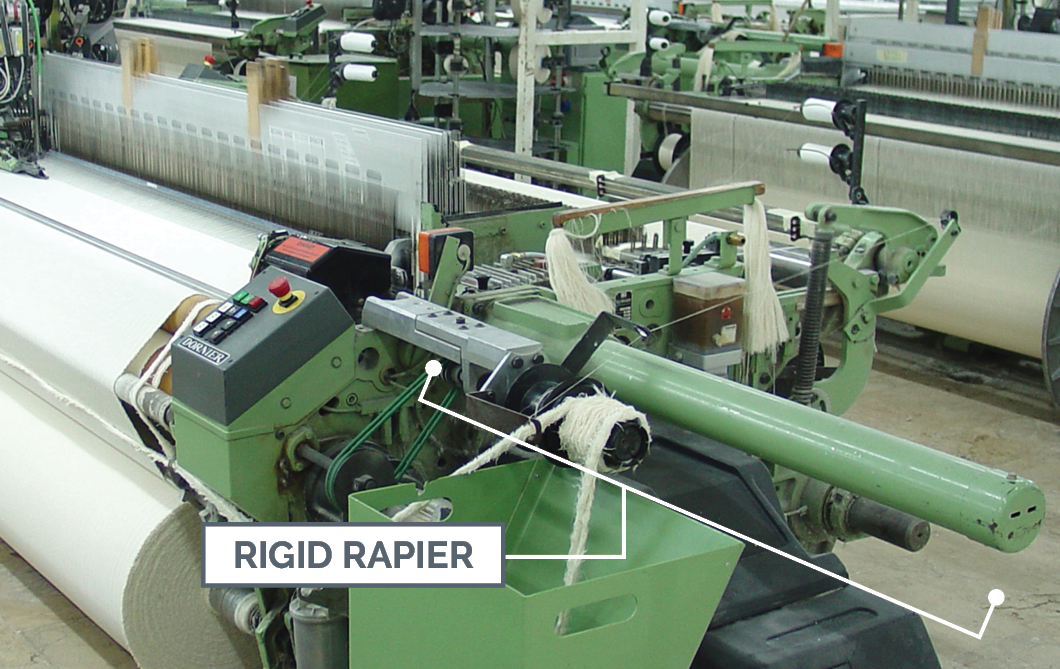
Rigid Rapier Machine. Rigid rapier machines weaving bottomweight fabric. The round pipe-like devices on the side of the machine are where the rapier is recessed after leaving the shed. The footprint of the loom has to accommodate for the rapier being stored completely outside the loom.
Projectile Filling Insertion
Projectile weaving machines contain a gripper that holds the filling yarn as the projectile is shot across the weave shed. A torsion bar stores up energy as it is twisted. When the energy is released, a connected lever (the picking arm) strikes the projectile, propelling the yarn across the machine.
The projectile follows a controlled path through a set of guide teeth which keep the projectile from flying out of the shed during weaving. A given machine will contain several projectiles, typically one per 10 inches of machine width. Projectiles are returned to the picking side of the machine via a type of conveyor-belt system. At any one time, several projectiles will be on the belt.
Projectile filling insertion machines typically run at 300 to 550 insertions per minute. With fewer moving parts, they require less maintenance than rapier machines. Projectile machines can produce a range of fabric weights, from lightweight shirting to denim.

Gripper device used in projectile weaving. The opening at the left holds the filling yarn as it is transferred across the warp
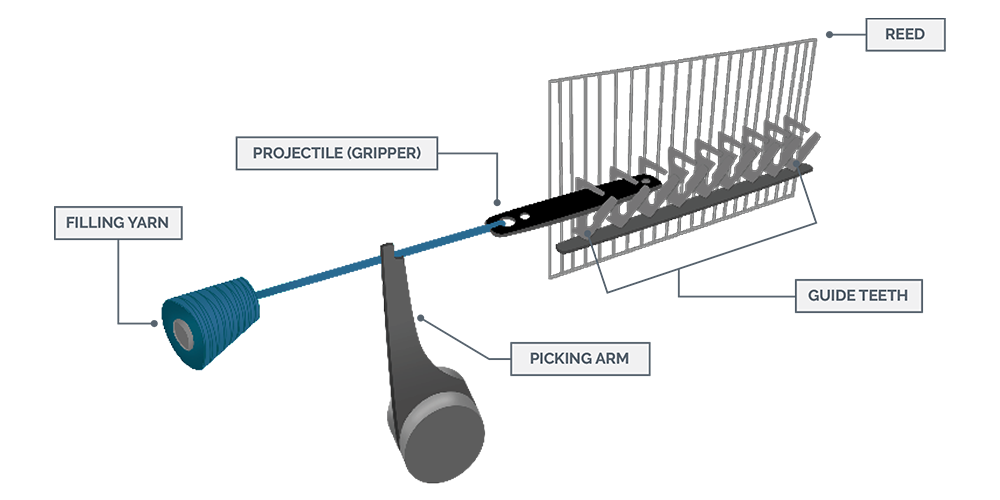
Projectile, gripping the filling yarn, is propelled into the loom by a picking arm and held in the shed by guide teeth that maintain the path across the fabric width.
Air Jet Filling Insertion
Air jet weaving machines use a burst of compressed air from an air nozzle to initially propel the filling yarn across the weave shed. Because the air disperses very quickly, additional relay air nozzles are evenly spaced across the width of the weave shed to continue to propel the yarn across the fabric width. Air jet machines use a special profiled reed to create a tunnel configuration through which the air and filling yarn travel across the weave shed.
Air jet weaving machines can insert relatively coarse yarns, such as yarns for heavy bottom-weight denim; however, yarns any heavier than that would be difficult and more costly to weave because of the high air pressures required. These machines can also weave finer spun yarns, but ultra-fine yarns might be blown apart by the intense air pressure. Spun yarns and textured filament weft yarns run well on these machines, but not slick flat filament yarns because of their low surface friction. Air jet machines have lower maintenance requirements and fewer replacement parts than do rapier and projectile machines. Insertion rates ranging from 600 to 1200 per minute are typical for air jet machines.
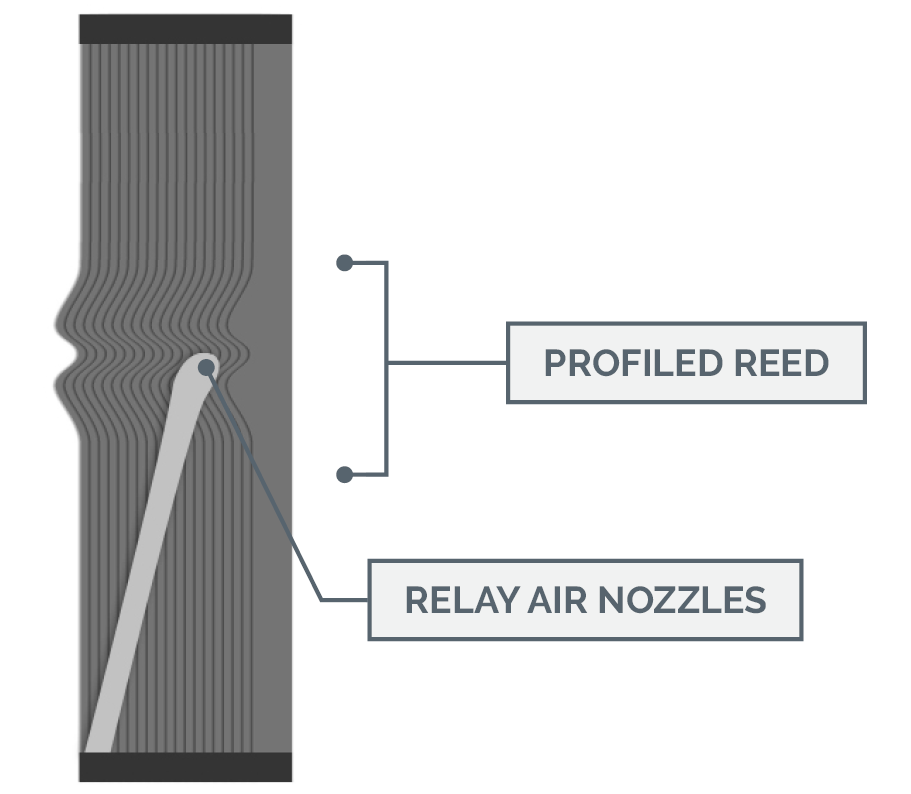
Profiled reed on an air jet loom. The distinctive shape of the profile helps the filling yarn travel the path across the warp shed
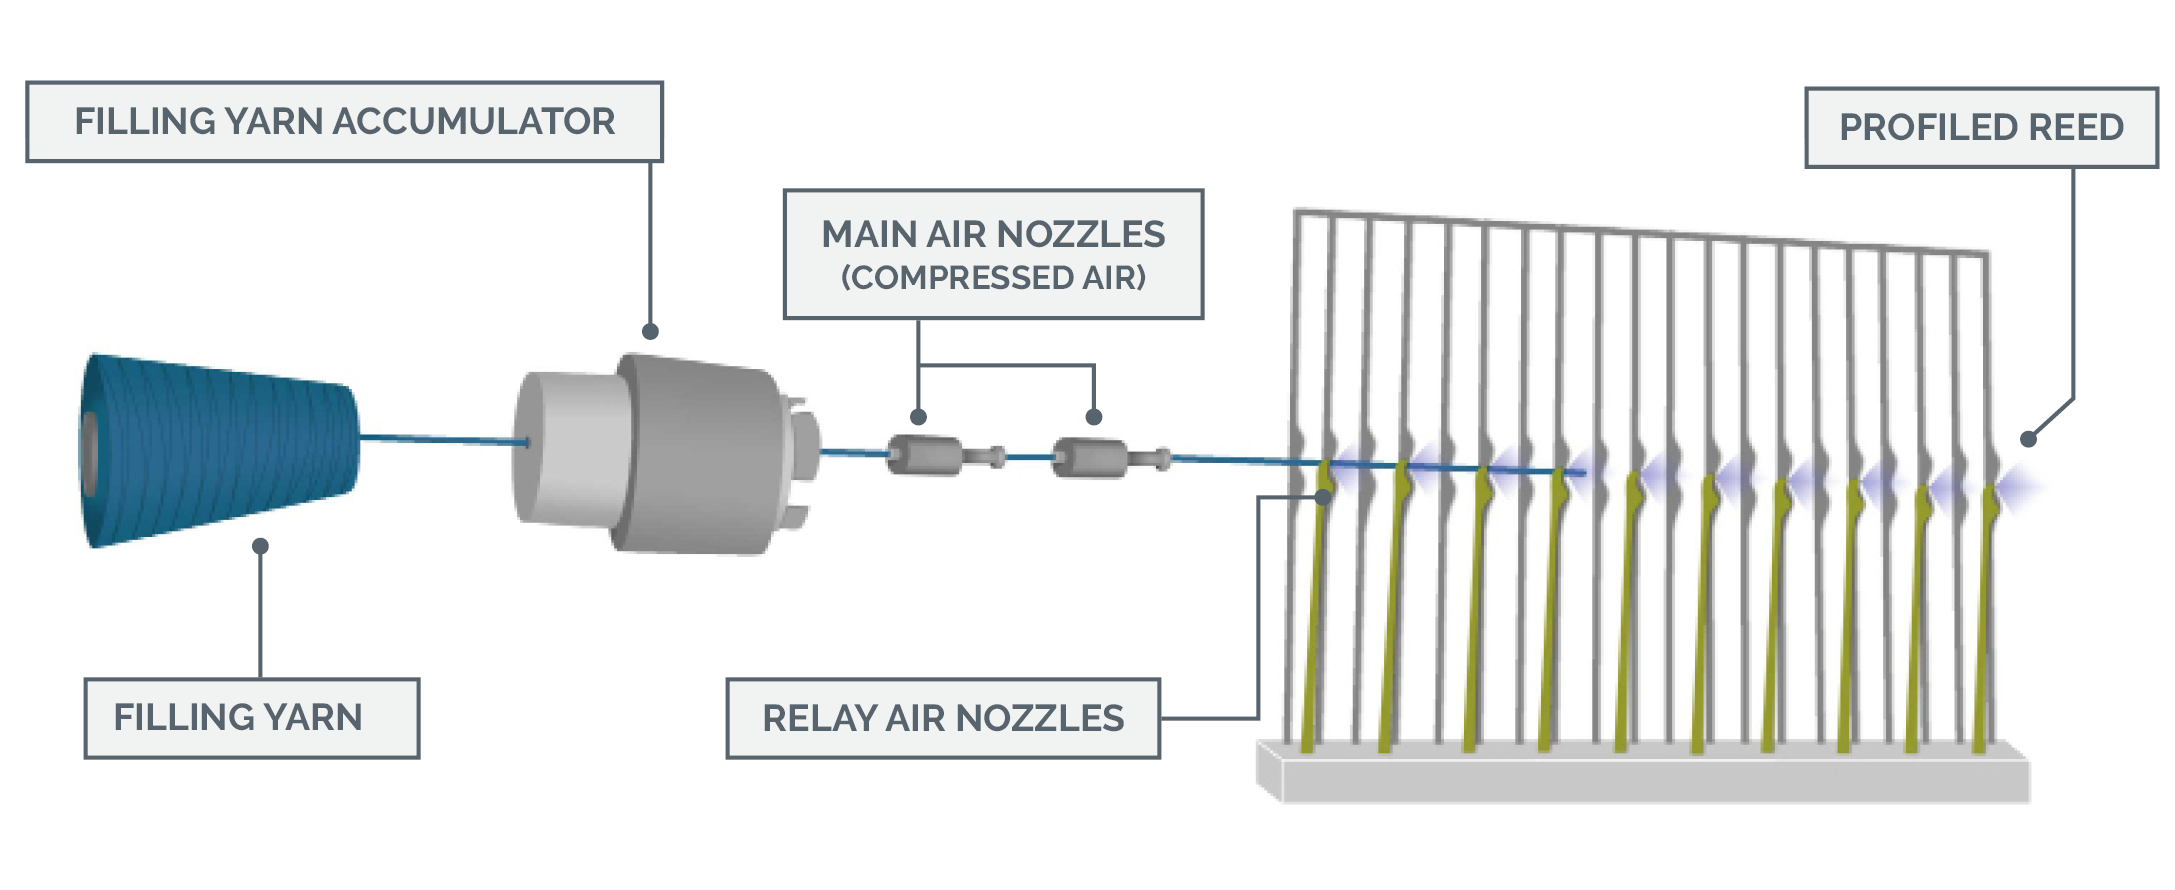
Air jet weaving propels a filling yarn across the width of the loom using compressed air, a profiled reed, and relay air nozzles.
Water Jet Filling Insertion
In water jet weaving, only hydrophobic fibers and yarns can be used, such as polyester, nylon, and olefin fibers. Most of the fabrics woven on these machines are made of filament yarns which are less absorbent than spun yarns. A vacuum slot on the front of the machine helps to remove any residual water from the fabric. All machine parts must be made of non-corrosive materials. Water jet weaving machines have insertion rates of 800 to 1200 picks per minute. The fabric most commonly made on water jet machines is mattress ticking.
Beat-Up
The reed, a comb-like device with slots or openings across its width, is responsible for the third basic motion of weaving, called beat-up.
Warp yarns are evenly spaced in the reed, usually with multiple ends through one dent. During the weaving cycle, the reed moves backwards to accommodate the shed and the filling insertion mechanism (projectile, rapier, shuttle, etc.). The filling yarn is inserted in front of the reed and the reed moves forward to beat the yarn into the fabric. Reeds are designated by reed number which indicates the number of dents or slots in the reed per inch of width.
For example, a 24 reed number means that the reed contains 24 dents per inch. Ends per inch in the fabric divided by ends per dent in the reed equals the reed number.
Weavers typically have an inventory of different reeds to accommodate various fabric styles with different numbers of ends per inch and warp-yarn sizes. The space between dents must be wide enough to allow any slubs or thick places in the warp yarn to pass through. Therefore each reed has a required amount of air space depending on whether filament or spun yarn is used. Spun yarns require more air space because of their unevenness.
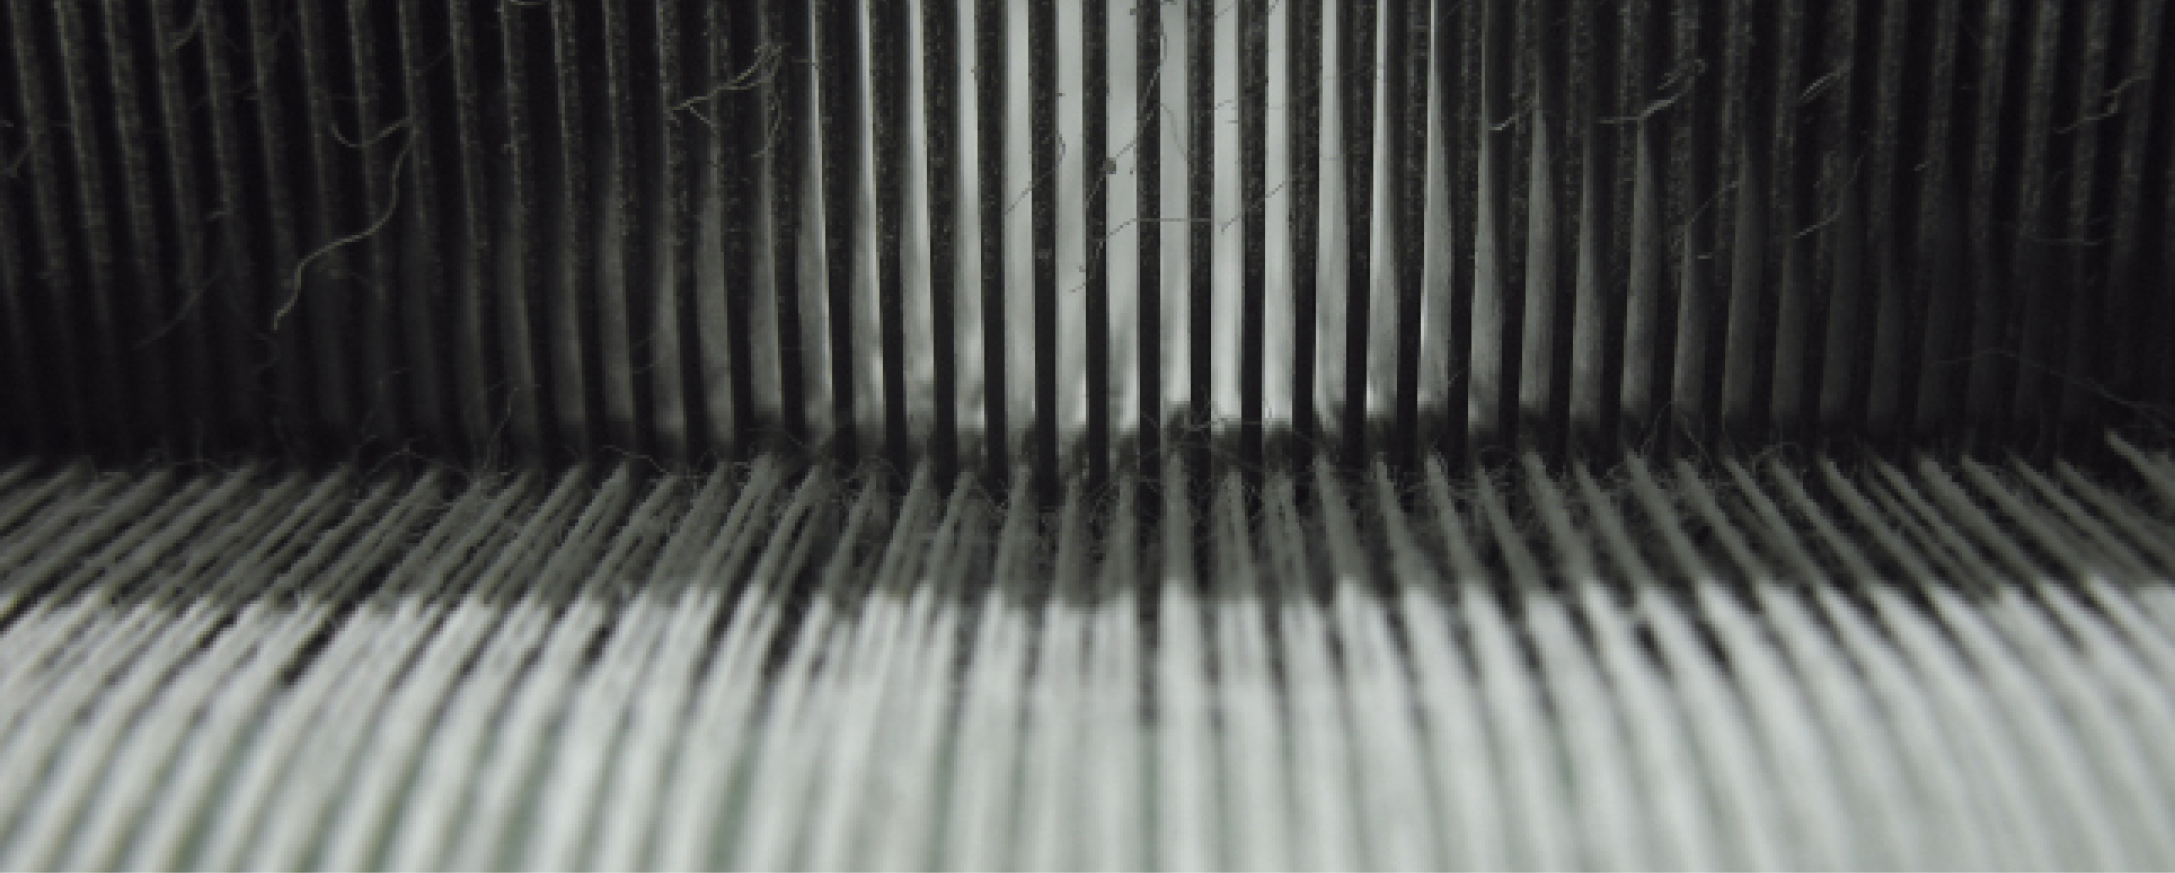
A close-up image of a reed in a production loom. The slots between the metal slats are the dents. It is apparent in this image that more than one yarn is pulled through each dent
Let-Off & Take-Up
Let-Off
In the fourth motion of weaving, let-off, the warp yarn is unwound from the loom beam. The rate of let-off must be controlled so that the warp yarns are not under excessive tension during shedding which would result in warp yarn breakage.
Take-Up
The fifth motion of weaving is take-up, or removal of fabric from the weaving machine. The rate of take-up controls the number of picks per inch inserted into the fabric. Slower take-up allows insertion of more weft yarns per inch, while faster take-up allows insertion of fewer weft yarns per inch and results in a higher production rate.
